> ## Documentation Index
> Fetch the complete documentation index at: https://docs.routera.io/llms.txt
> Use this file to discover all available pages before exploring further.
# Creating routers
> Build and publish routers to assign record owners—starting with Routera-only routing.
Routers assign owners to records: who is in the rotation, how work is split (round robin or percentage), and what happens when someone is unavailable. **Most teams should start with Routera only**—routing and enrollment stay entirely in Routera, with no HubSpot workflow required.
If you need assignments to sync with HubSpot and run from HubSpot workflows, use **HubSpot CRM** mode instead. See [HubSpot CRM routers](#hubspot-crm-routers) below.
## Before you start
* **[Users](/kb/inviting-users)** in the workspace.
* **[Teams](/kb/creating-teams)** (optional) to rotate by team instead of picking users individually.
* **[User availability](/kb/user-availability)** so overwrite rules and backup routing respect schedules.
For [HubSpot CRM routers](#hubspot-crm-routers), you also need an active [HubSpot integration](/kb/integrate-hubspot) and users linked to HubSpot.
## Open the router editor
1. In the sidebar, open **Routers**.
2. Click **Create Router** (or open an existing draft from the list to keep editing).
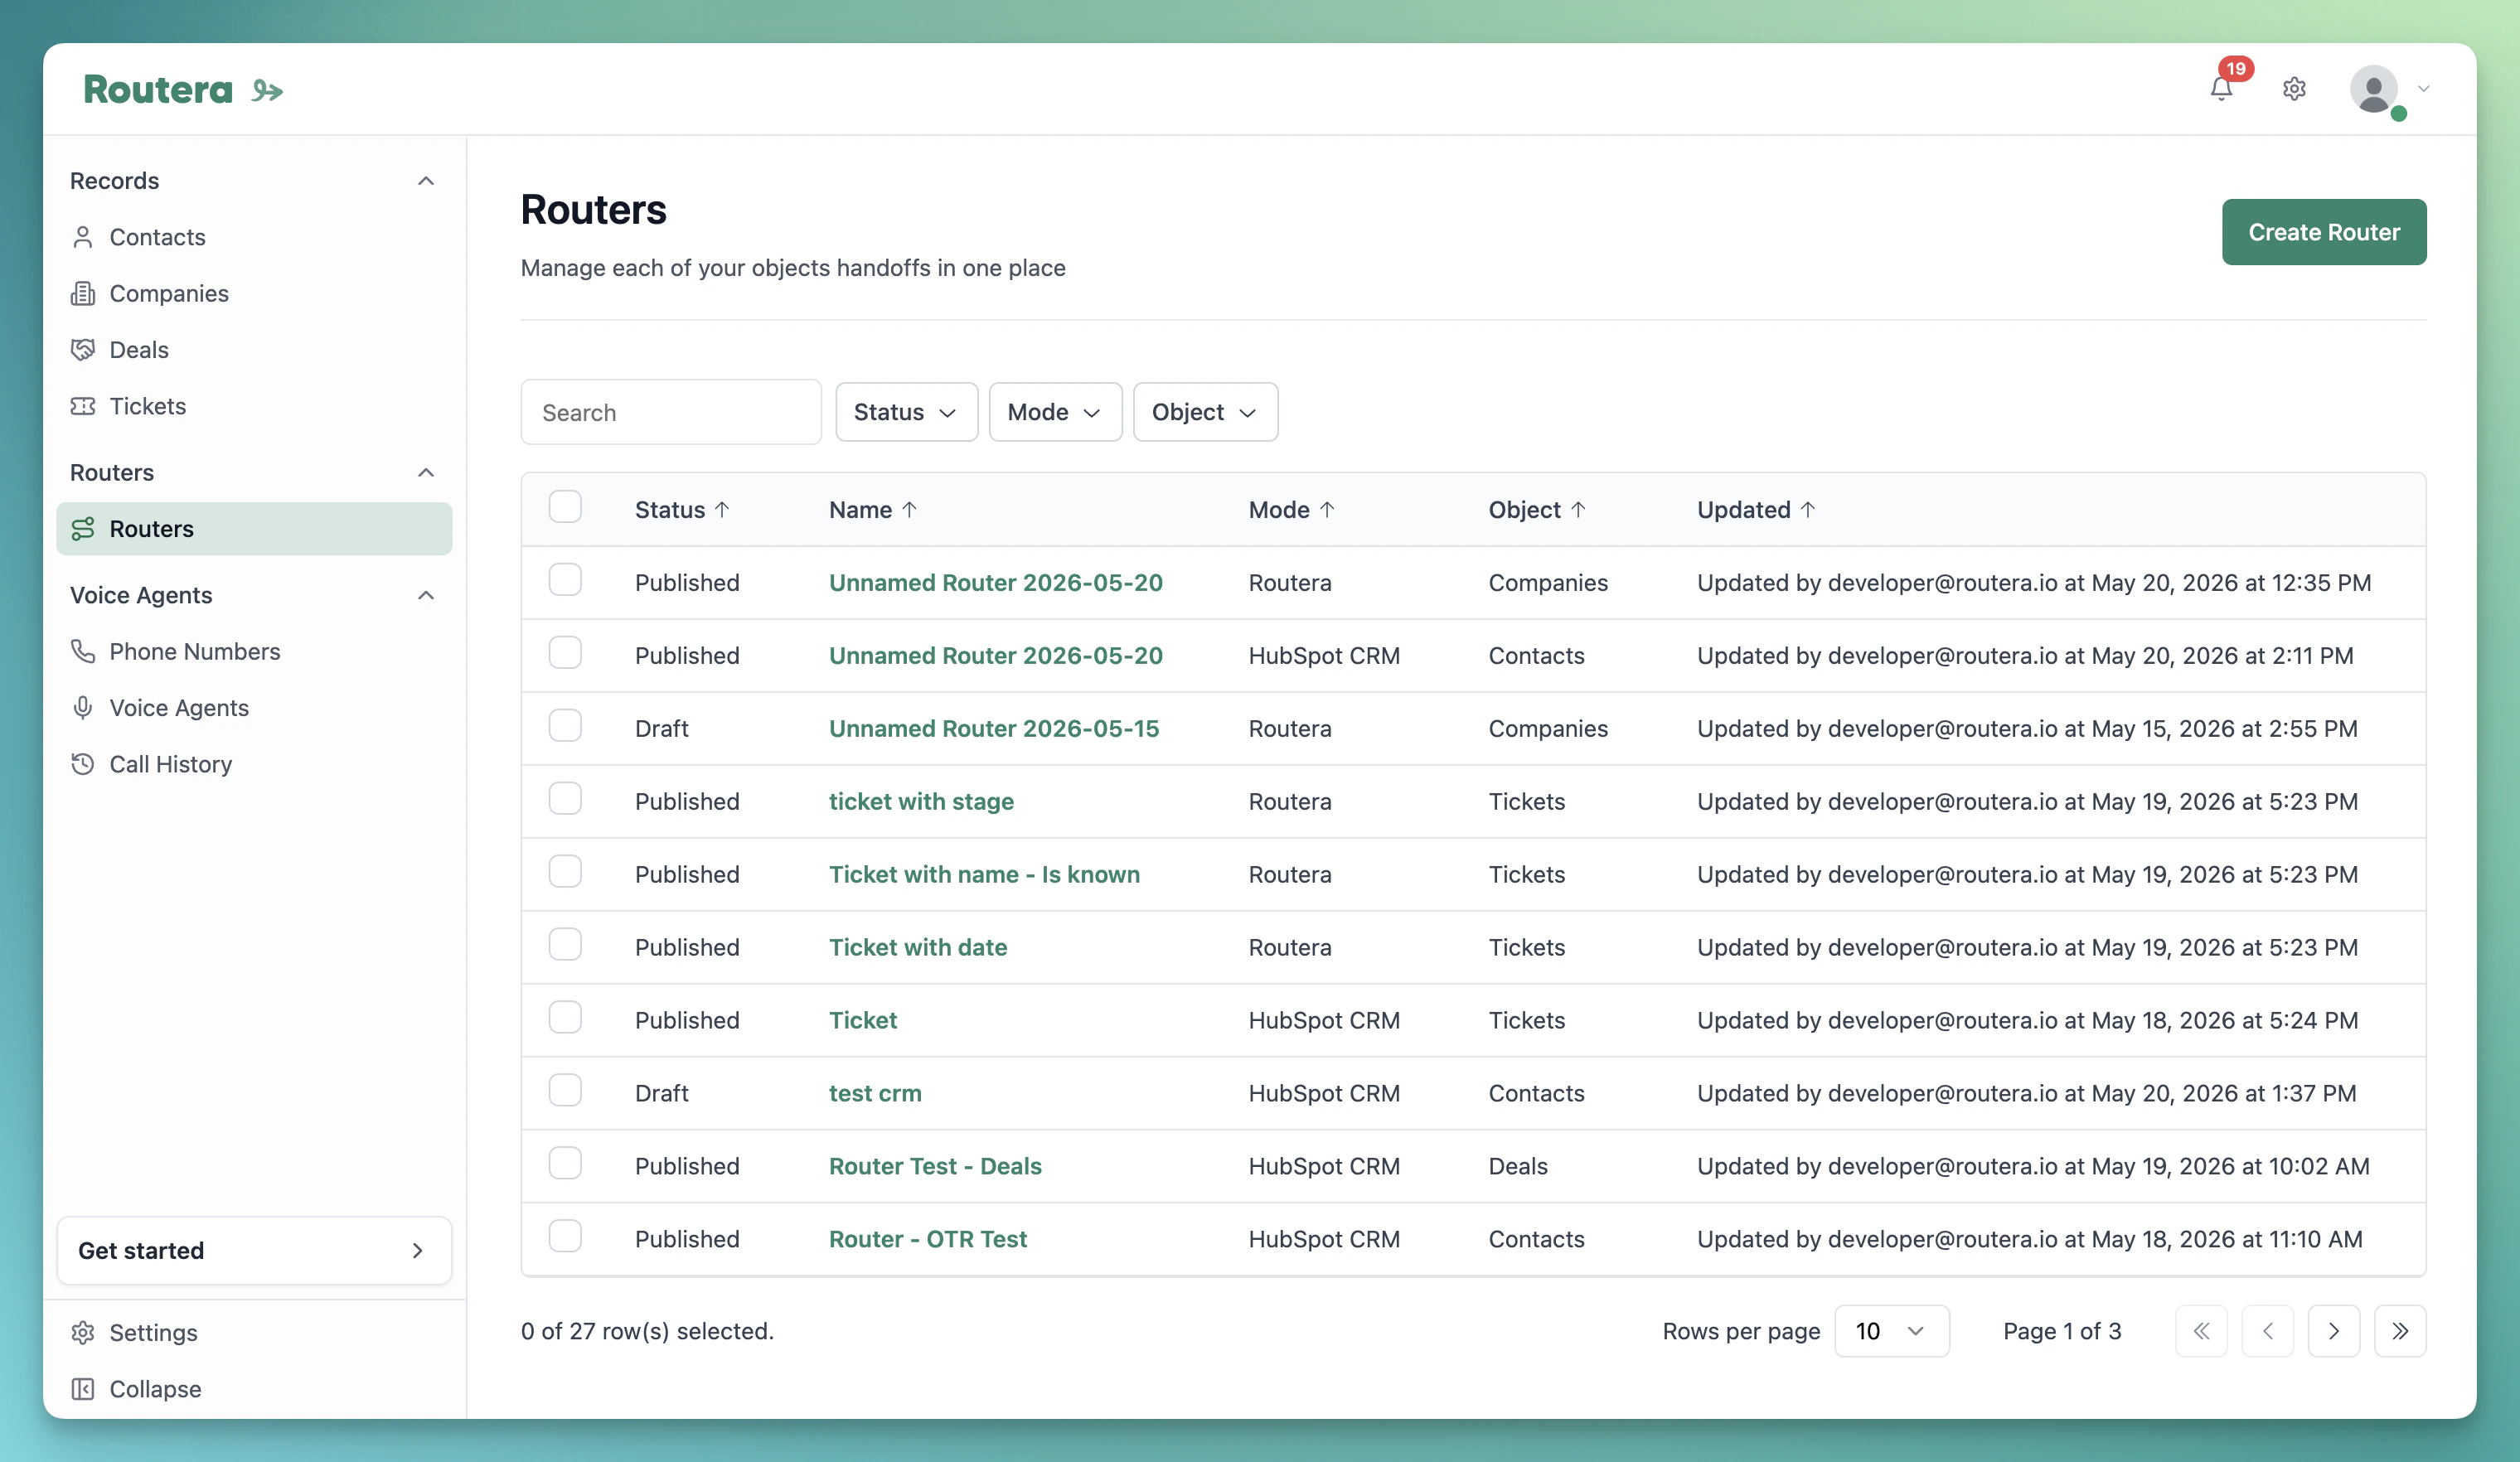 Draft routers stay unpublished until you **Publish**. You can **Save** anytime without going live.
## Choose how the router runs
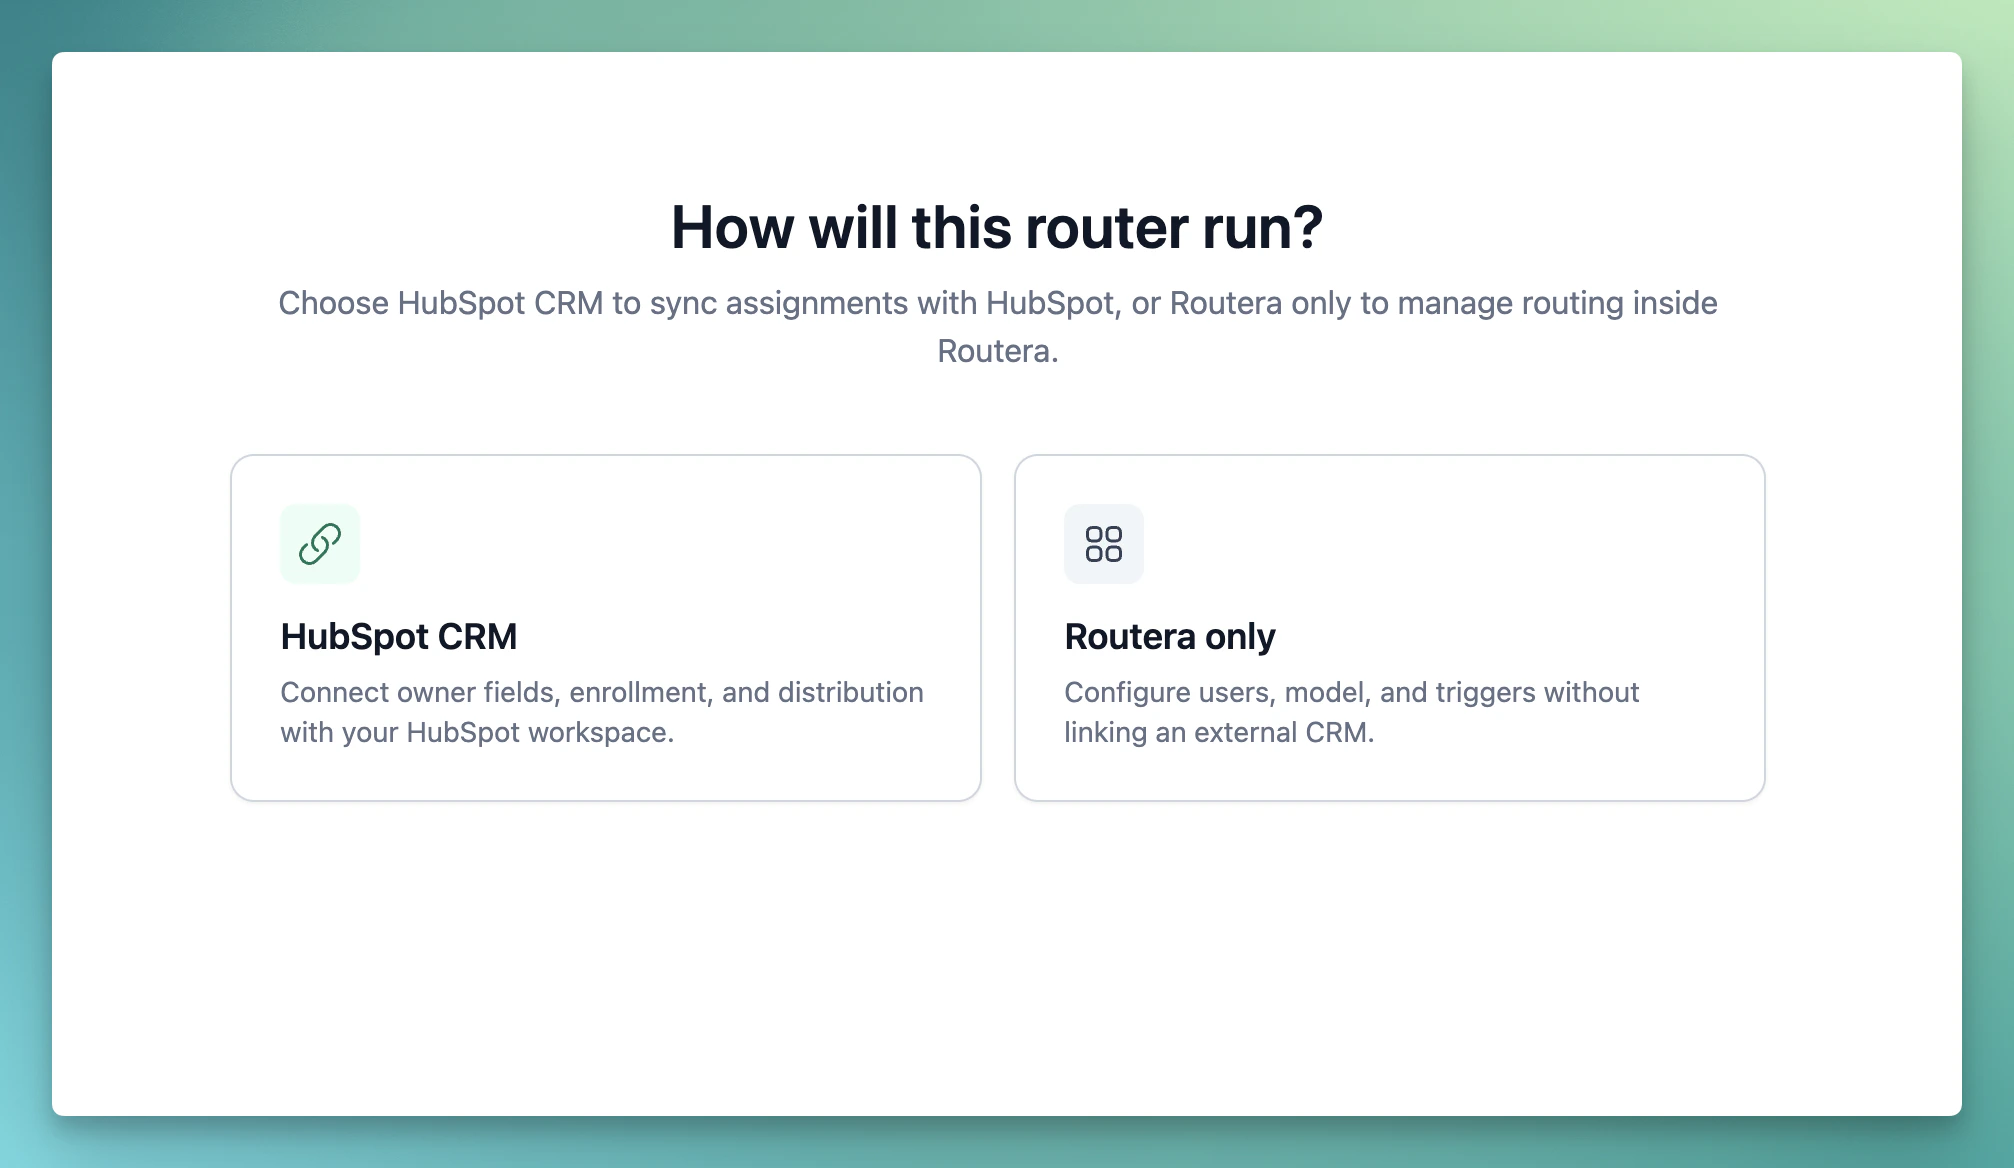
On a new router, select **Routera only** unless you specifically need HubSpot to trigger assignments:
| Mode | Best for | Tabs you will configure |
| ------------------------------ | ---------------------------------------------------------------------- | -------------------------------------------------- |
| **Routera only** (recommended) | Routing and enrollment inside Routera | Configuration → Enrollment Trigger → Users → Model |
| **HubSpot CRM** | Owners and workflows in HubSpot; **Assign with Routera** in a workflow | Configuration → Users → Model → Account Matching |
Draft routers stay unpublished until you **Publish**. You can **Save** anytime without going live.
## Choose how the router runs
On a new router, select **Routera only** unless you specifically need HubSpot to trigger assignments:
| Mode | Best for | Tabs you will configure |
| ------------------------------ | ---------------------------------------------------------------------- | -------------------------------------------------- |
| **Routera only** (recommended) | Routing and enrollment inside Routera | Configuration → Enrollment Trigger → Users → Model |
| **HubSpot CRM** | Owners and workflows in HubSpot; **Assign with Routera** in a workflow | Configuration → Users → Model → Account Matching |
 ***
## Routera-only routers
This is the default path: configure the router in Routera, define who gets enrolled, publish, and assignments run from Routera data.
### Configuration
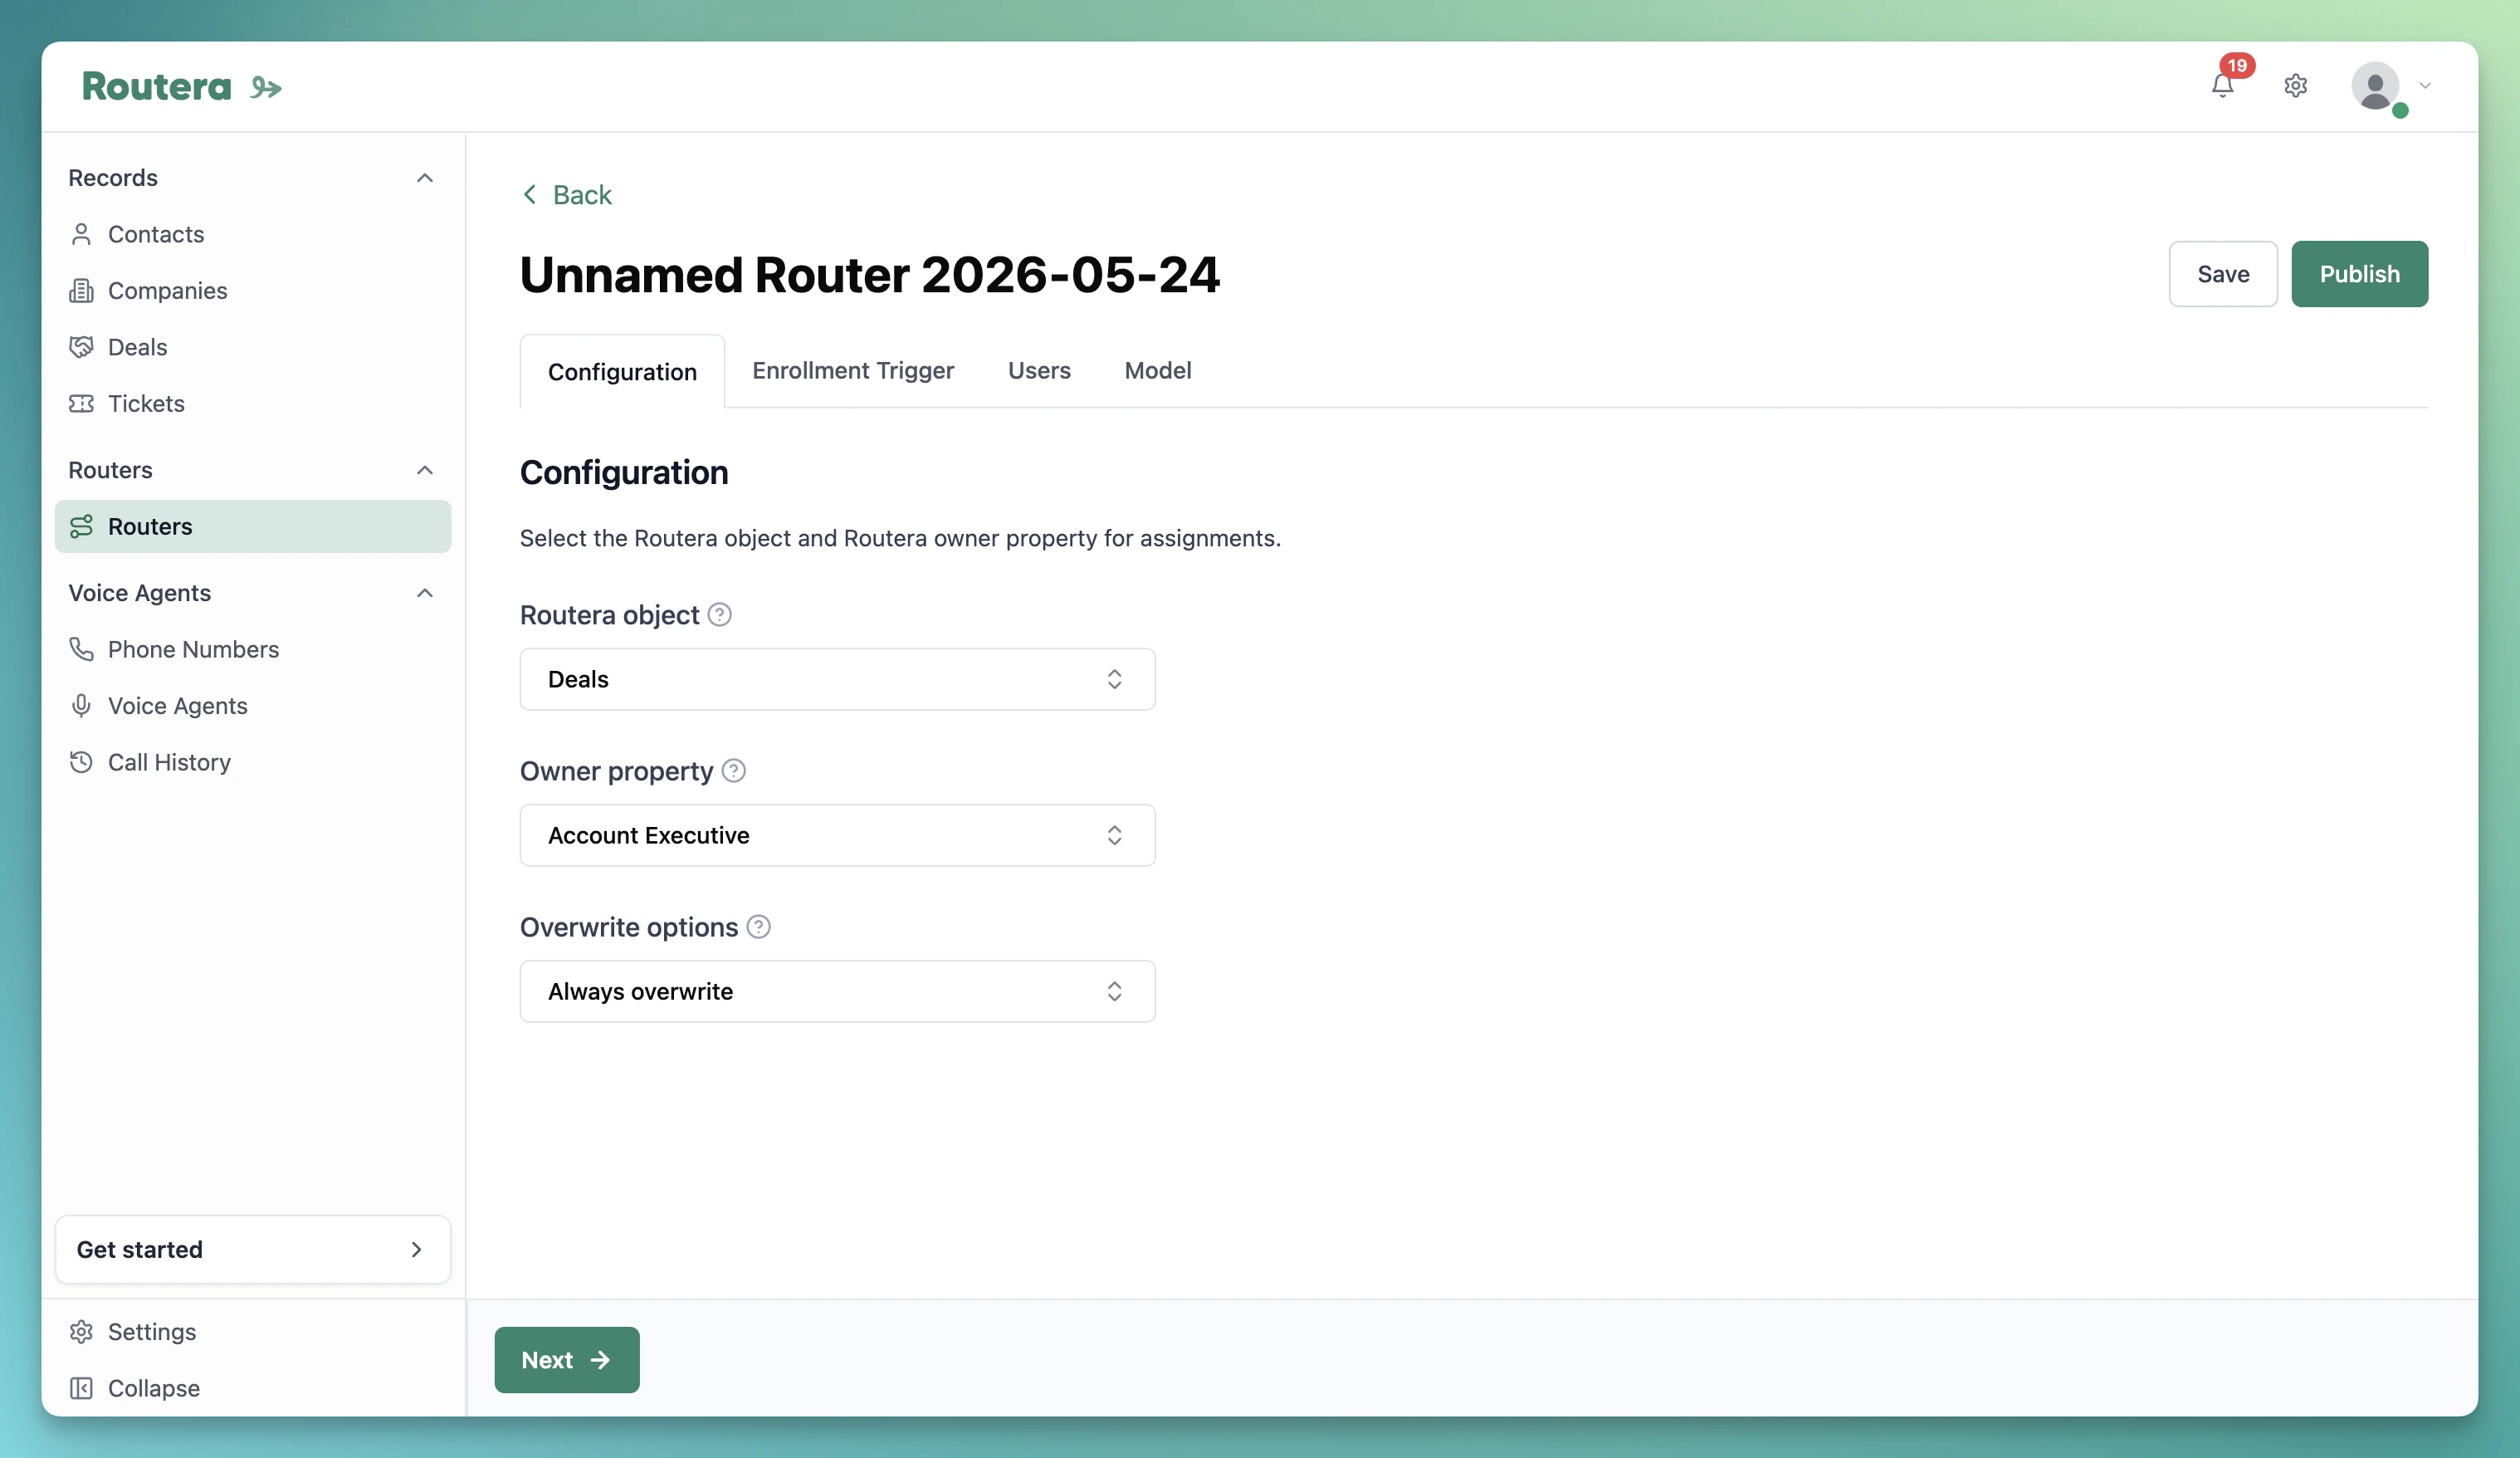
Rename the router at the top of the page, then on the **Configuration** tab set:
1. **Routera object** — Contacts, Companies, Deals, or Tickets.
2. **Owner property** — the user field Routera updates when it assigns (for example Contact Owner).
3. **Overwrite options**:
* **Never overwrite** — keep the current owner if one exists.
* **Overwrite only if current user is not available** — reassign when the current owner is out of office or outside working hours.
* **Always overwrite** — assign a new owner every time the router runs.
***
## Routera-only routers
This is the default path: configure the router in Routera, define who gets enrolled, publish, and assignments run from Routera data.
### Configuration
Rename the router at the top of the page, then on the **Configuration** tab set:
1. **Routera object** — Contacts, Companies, Deals, or Tickets.
2. **Owner property** — the user field Routera updates when it assigns (for example Contact Owner).
3. **Overwrite options**:
* **Never overwrite** — keep the current owner if one exists.
* **Overwrite only if current user is not available** — reassign when the current owner is out of office or outside working hours.
* **Always overwrite** — assign a new owner every time the router runs.
 ### Enrollment Trigger
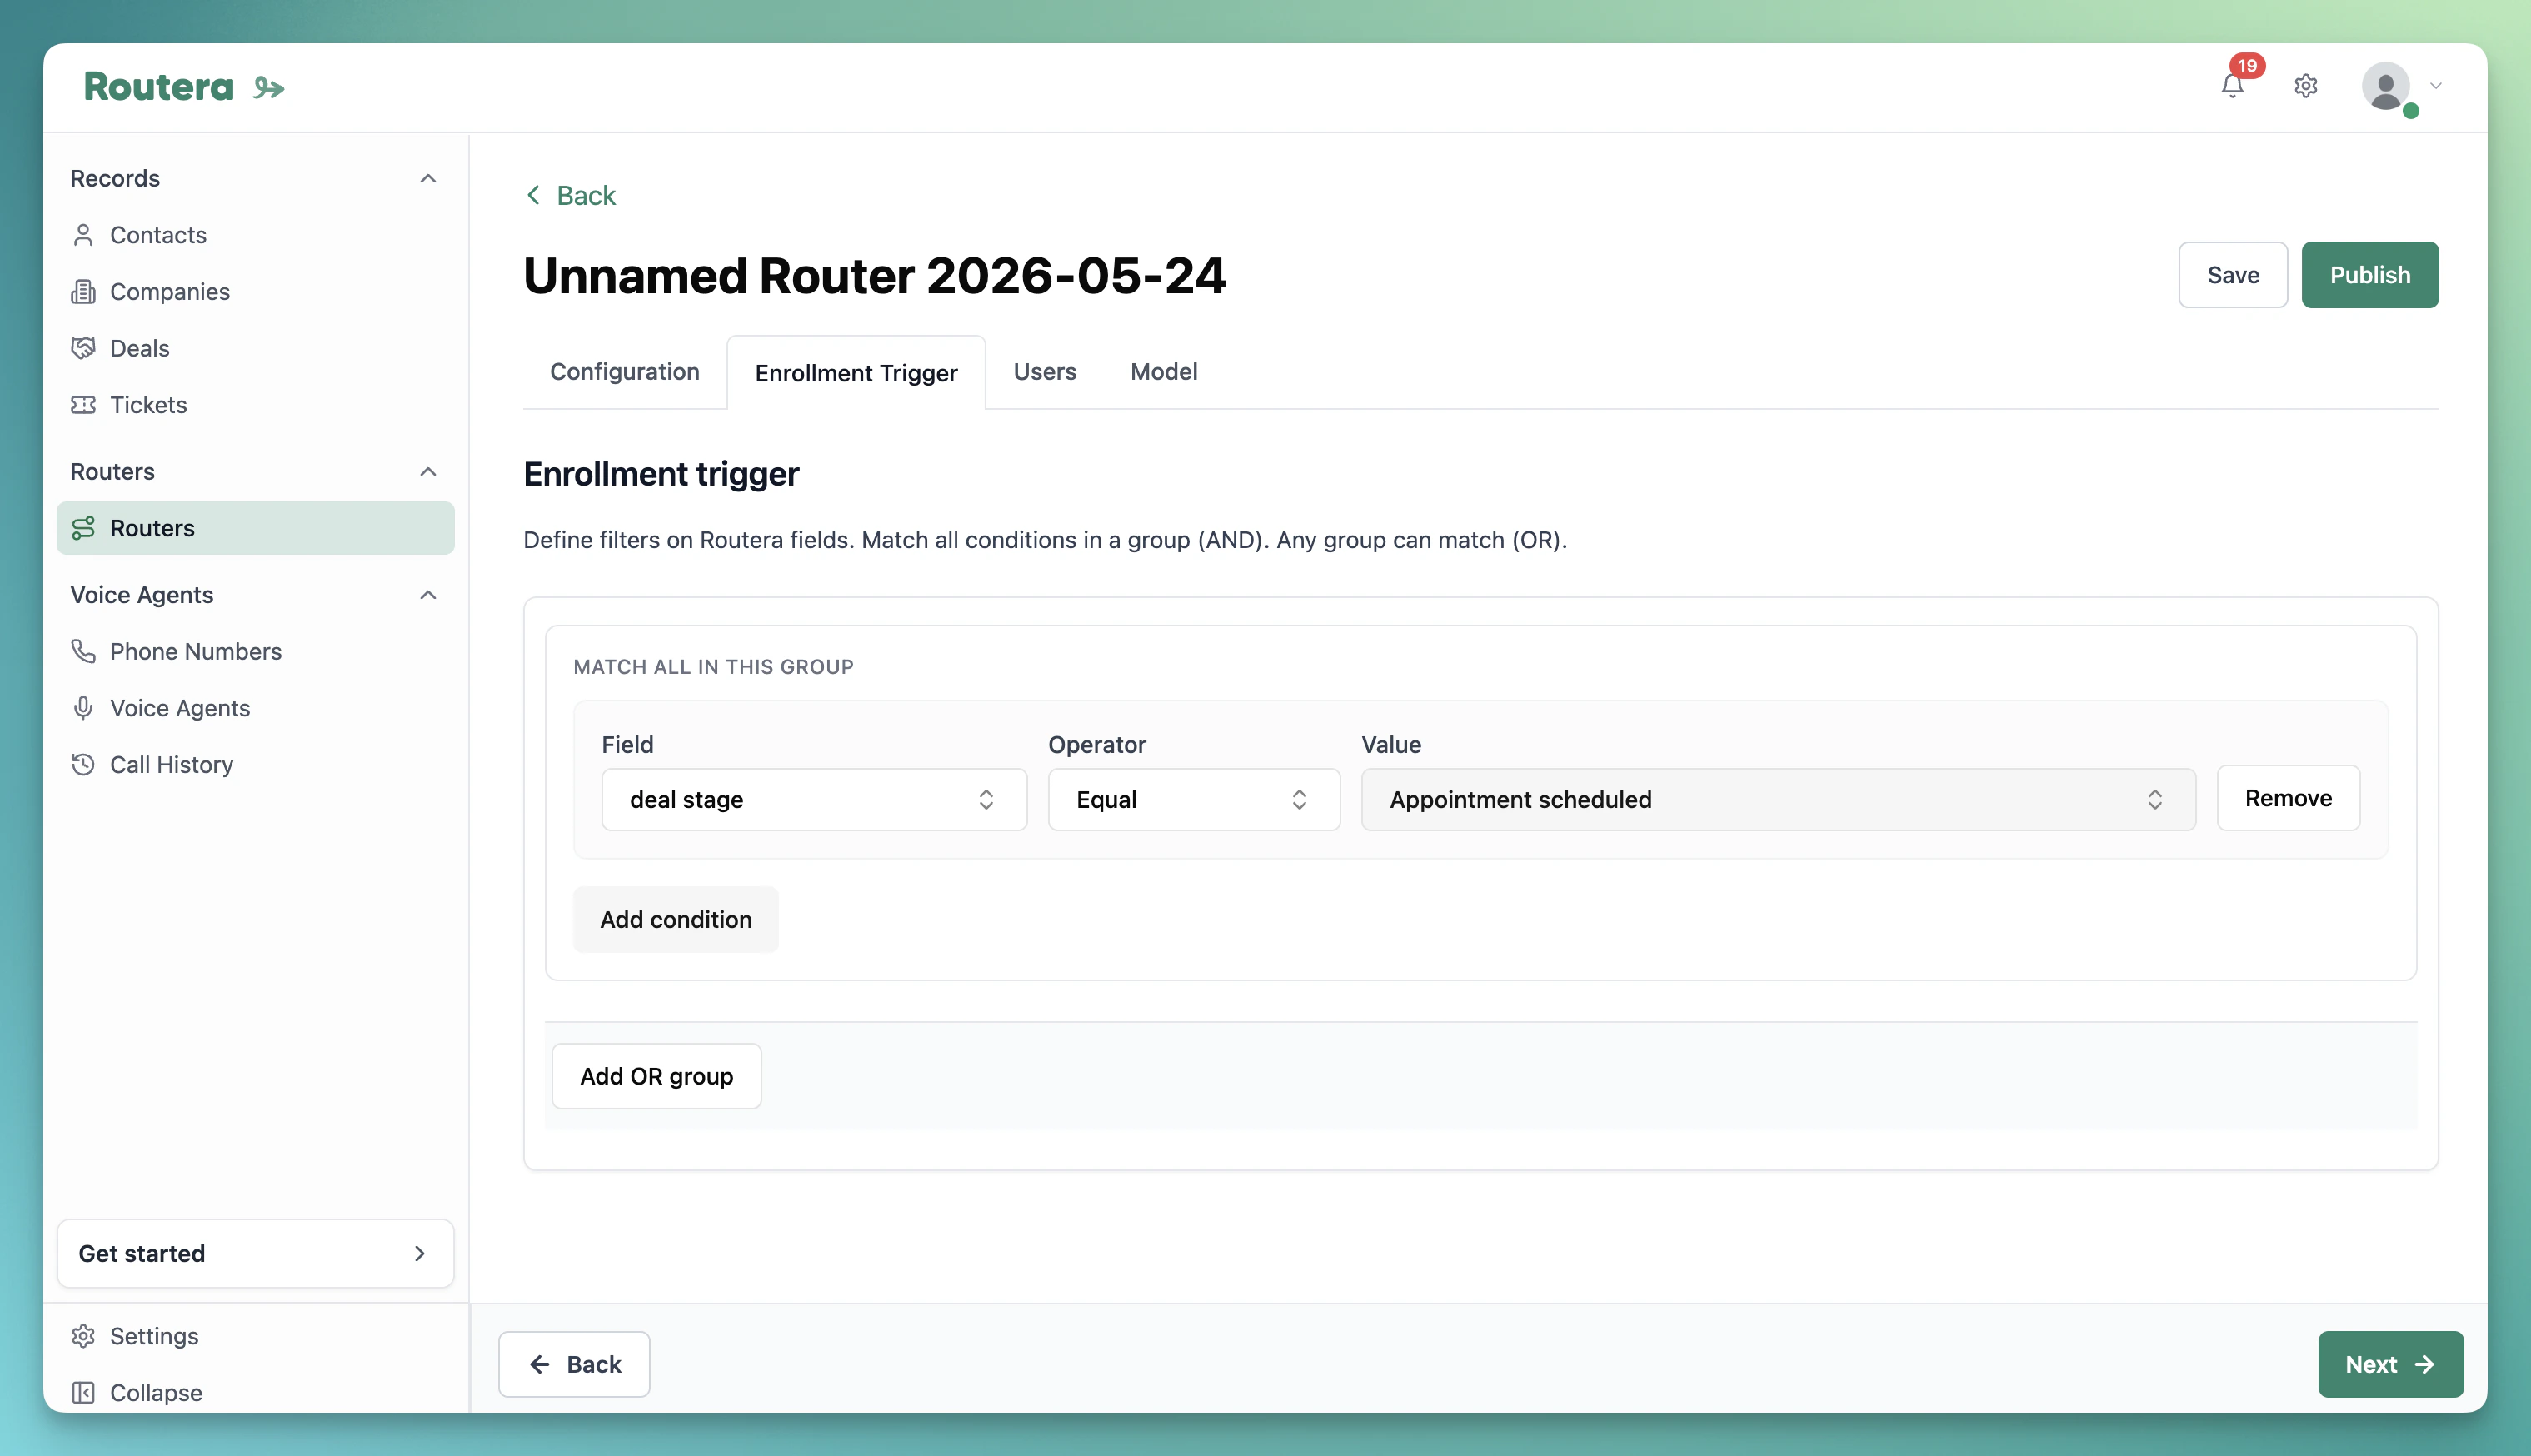
On **Enrollment Trigger**, define which records enter this router when it is published:
* Conditions in one group use **And** (all must match).
* Separate groups use **Or** (any group can match).
* For each condition, pick a **Field**, **Operator** (equal, contains, is known, etc.), and **Value** as needed.
Click **Add condition** to start a group, add more conditions in the same group for **And** rules, or **Add OR group** for alternate criteria.
At least one complete trigger group is **required** before you can publish a Routera-only router. Select the **Routera object** on Configuration first—field choices depend on it.
### Enrollment Trigger
On **Enrollment Trigger**, define which records enter this router when it is published:
* Conditions in one group use **And** (all must match).
* Separate groups use **Or** (any group can match).
* For each condition, pick a **Field**, **Operator** (equal, contains, is known, etc.), and **Value** as needed.
Click **Add condition** to start a group, add more conditions in the same group for **And** rules, or **Add OR group** for alternate criteria.
At least one complete trigger group is **required** before you can publish a Routera-only router. Select the **Routera object** on Configuration first—field choices depend on it.
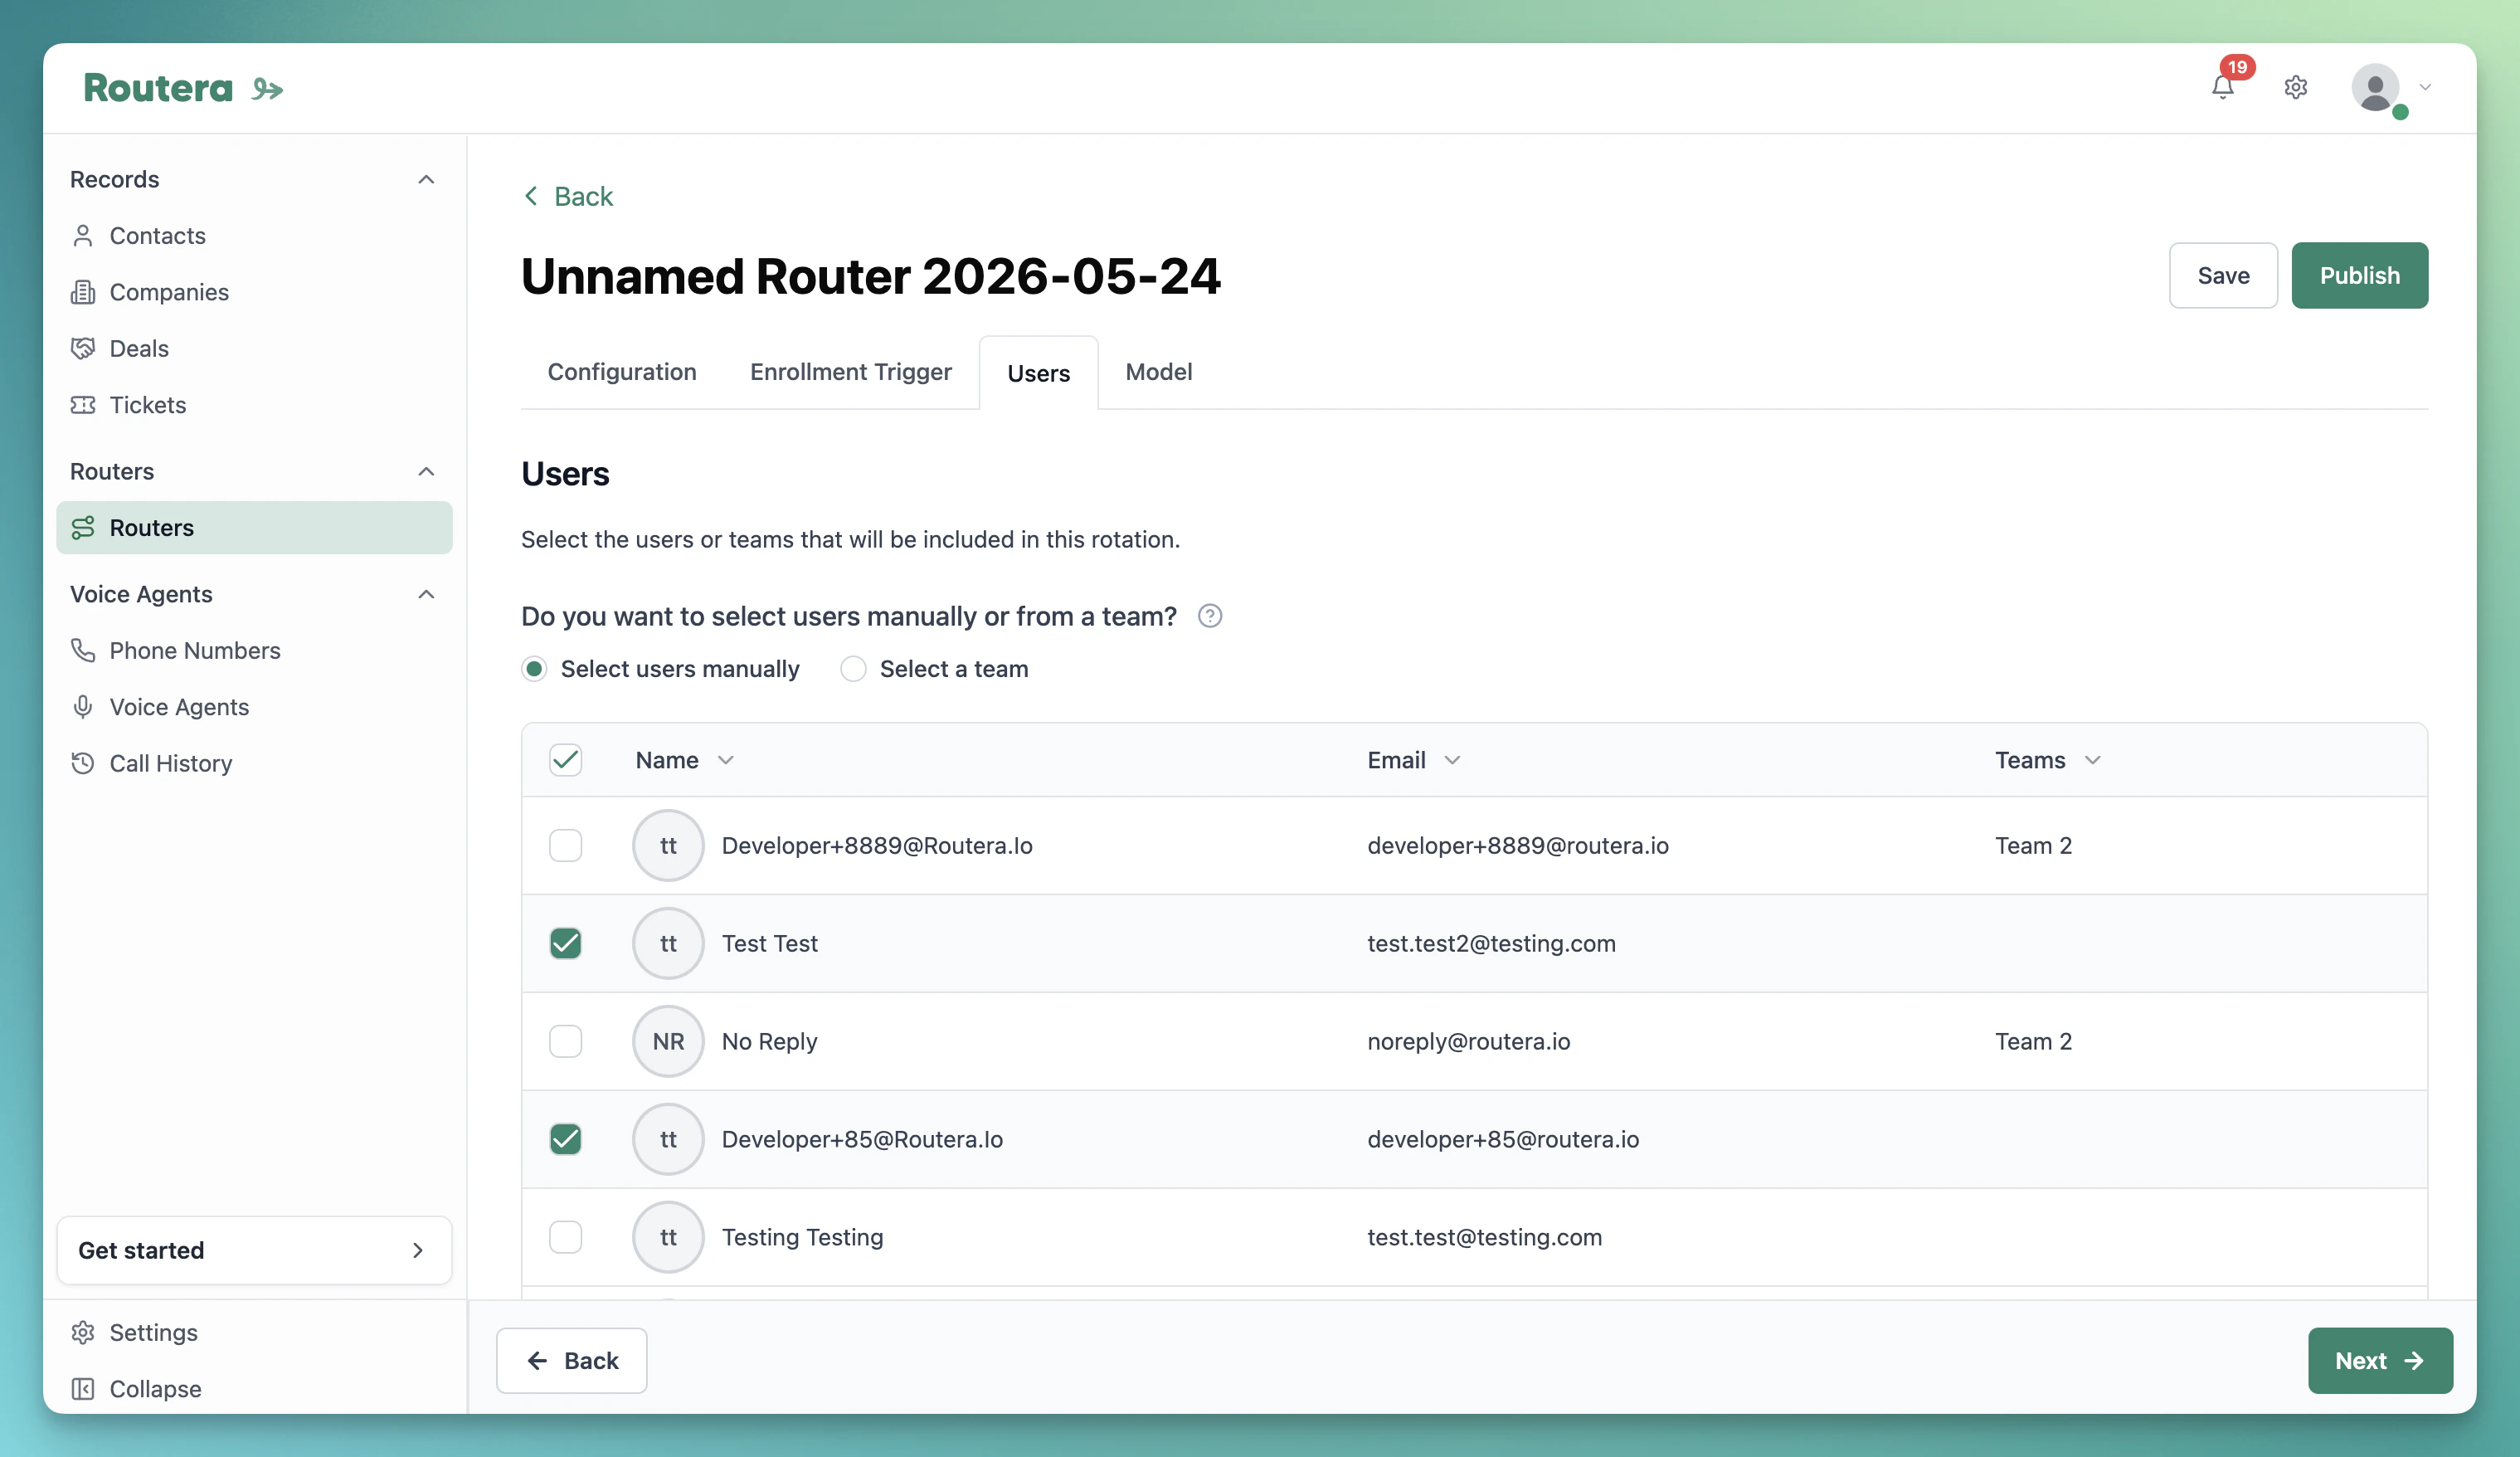
 ### Users
On the **Users** tab:
1. Choose **Select users manually** or **Select a team**.
2. Check the users or teams to include. Team selection uses **team members** (not managers) for the rotation.
3. Set a **Backup user** (or enable **Disable backup user** so no owner is assigned when everyone is unavailable).
4. Optionally enable **Ignore working hours when all users are unavailable** so the router can still assign when the whole group is outside working hours.
All workspace members can be included.
### Users
On the **Users** tab:
1. Choose **Select users manually** or **Select a team**.
2. Check the users or teams to include. Team selection uses **team members** (not managers) for the rotation.
3. Set a **Backup user** (or enable **Disable backup user** so no owner is assigned when everyone is unavailable).
4. Optionally enable **Ignore working hours when all users are unavailable** so the router can still assign when the whole group is outside working hours.
All workspace members can be included.
 ### Model
On the **Model** tab, pick how records are distributed:
**Round Robin** — Each user receives roughly the same number of records over time. Drag rows to set assignment order.
**Percentage** — Set each user’s share of assignments. The total must equal **100%**; Routera shows an error until it does.
Click **View queue** on either model to preview how the next records would be assigned.
### Save, publish, and route existing records
1. Click **Save & Publish** on a new router, or **Save** then **Publish** on a draft.
2. On first publish, you may see **Route existing leads?**
* **No, new records only** — only records that match after publish are enrolled going forward.
* **Yes, include existing** — Routera also processes records that already match your trigger (can take several minutes on large sets).
Use **Unpublish** on a live router to stop new assignments without deleting configuration.
***
## HubSpot CRM routers
Use this path when records are coming from HubSpot and enrollment happens through a **HubSpot workflow** (not Routera enrollment triggers).
**HubSpot CRM** requires an active HubSpot connection. If it is missing or inactive, Routera prompts you to open **Settings** → **Integrations** before continuing.
### HubSpot configuration
On the **Configuration** tab set:
1. **HubSpot object** — Contact, Company, Deal, or Ticket (aligned with your Routera object type).
2. **Owner property** — the HubSpot owner field Routera updates when it assigns.
3. **Overwrite options** — same three choices as in the Routera-only **Configuration** section above.
### Users and Model
Configure **Users** and **Model** the same way as in the Routera-only sections above. For CRM routers, only users linked to HubSpot appear in the user list.
### Account Matching
On the **Account Matching** tab (optional):
1. Turn on **Enable account matching**.
2. Choose **which HubSpot object** to pull an owner from (for example Company when the router targets Contacts).
3. Choose **which record** to use if several exist: most recently updated, most recently created, or first created.
Example: a contact router can inherit the **company owner** when the contact has no owner.
### Model
On the **Model** tab, pick how records are distributed:
**Round Robin** — Each user receives roughly the same number of records over time. Drag rows to set assignment order.
**Percentage** — Set each user’s share of assignments. The total must equal **100%**; Routera shows an error until it does.
Click **View queue** on either model to preview how the next records would be assigned.
### Save, publish, and route existing records
1. Click **Save & Publish** on a new router, or **Save** then **Publish** on a draft.
2. On first publish, you may see **Route existing leads?**
* **No, new records only** — only records that match after publish are enrolled going forward.
* **Yes, include existing** — Routera also processes records that already match your trigger (can take several minutes on large sets).
Use **Unpublish** on a live router to stop new assignments without deleting configuration.
***
## HubSpot CRM routers
Use this path when records are coming from HubSpot and enrollment happens through a **HubSpot workflow** (not Routera enrollment triggers).
**HubSpot CRM** requires an active HubSpot connection. If it is missing or inactive, Routera prompts you to open **Settings** → **Integrations** before continuing.
### HubSpot configuration
On the **Configuration** tab set:
1. **HubSpot object** — Contact, Company, Deal, or Ticket (aligned with your Routera object type).
2. **Owner property** — the HubSpot owner field Routera updates when it assigns.
3. **Overwrite options** — same three choices as in the Routera-only **Configuration** section above.
### Users and Model
Configure **Users** and **Model** the same way as in the Routera-only sections above. For CRM routers, only users linked to HubSpot appear in the user list.
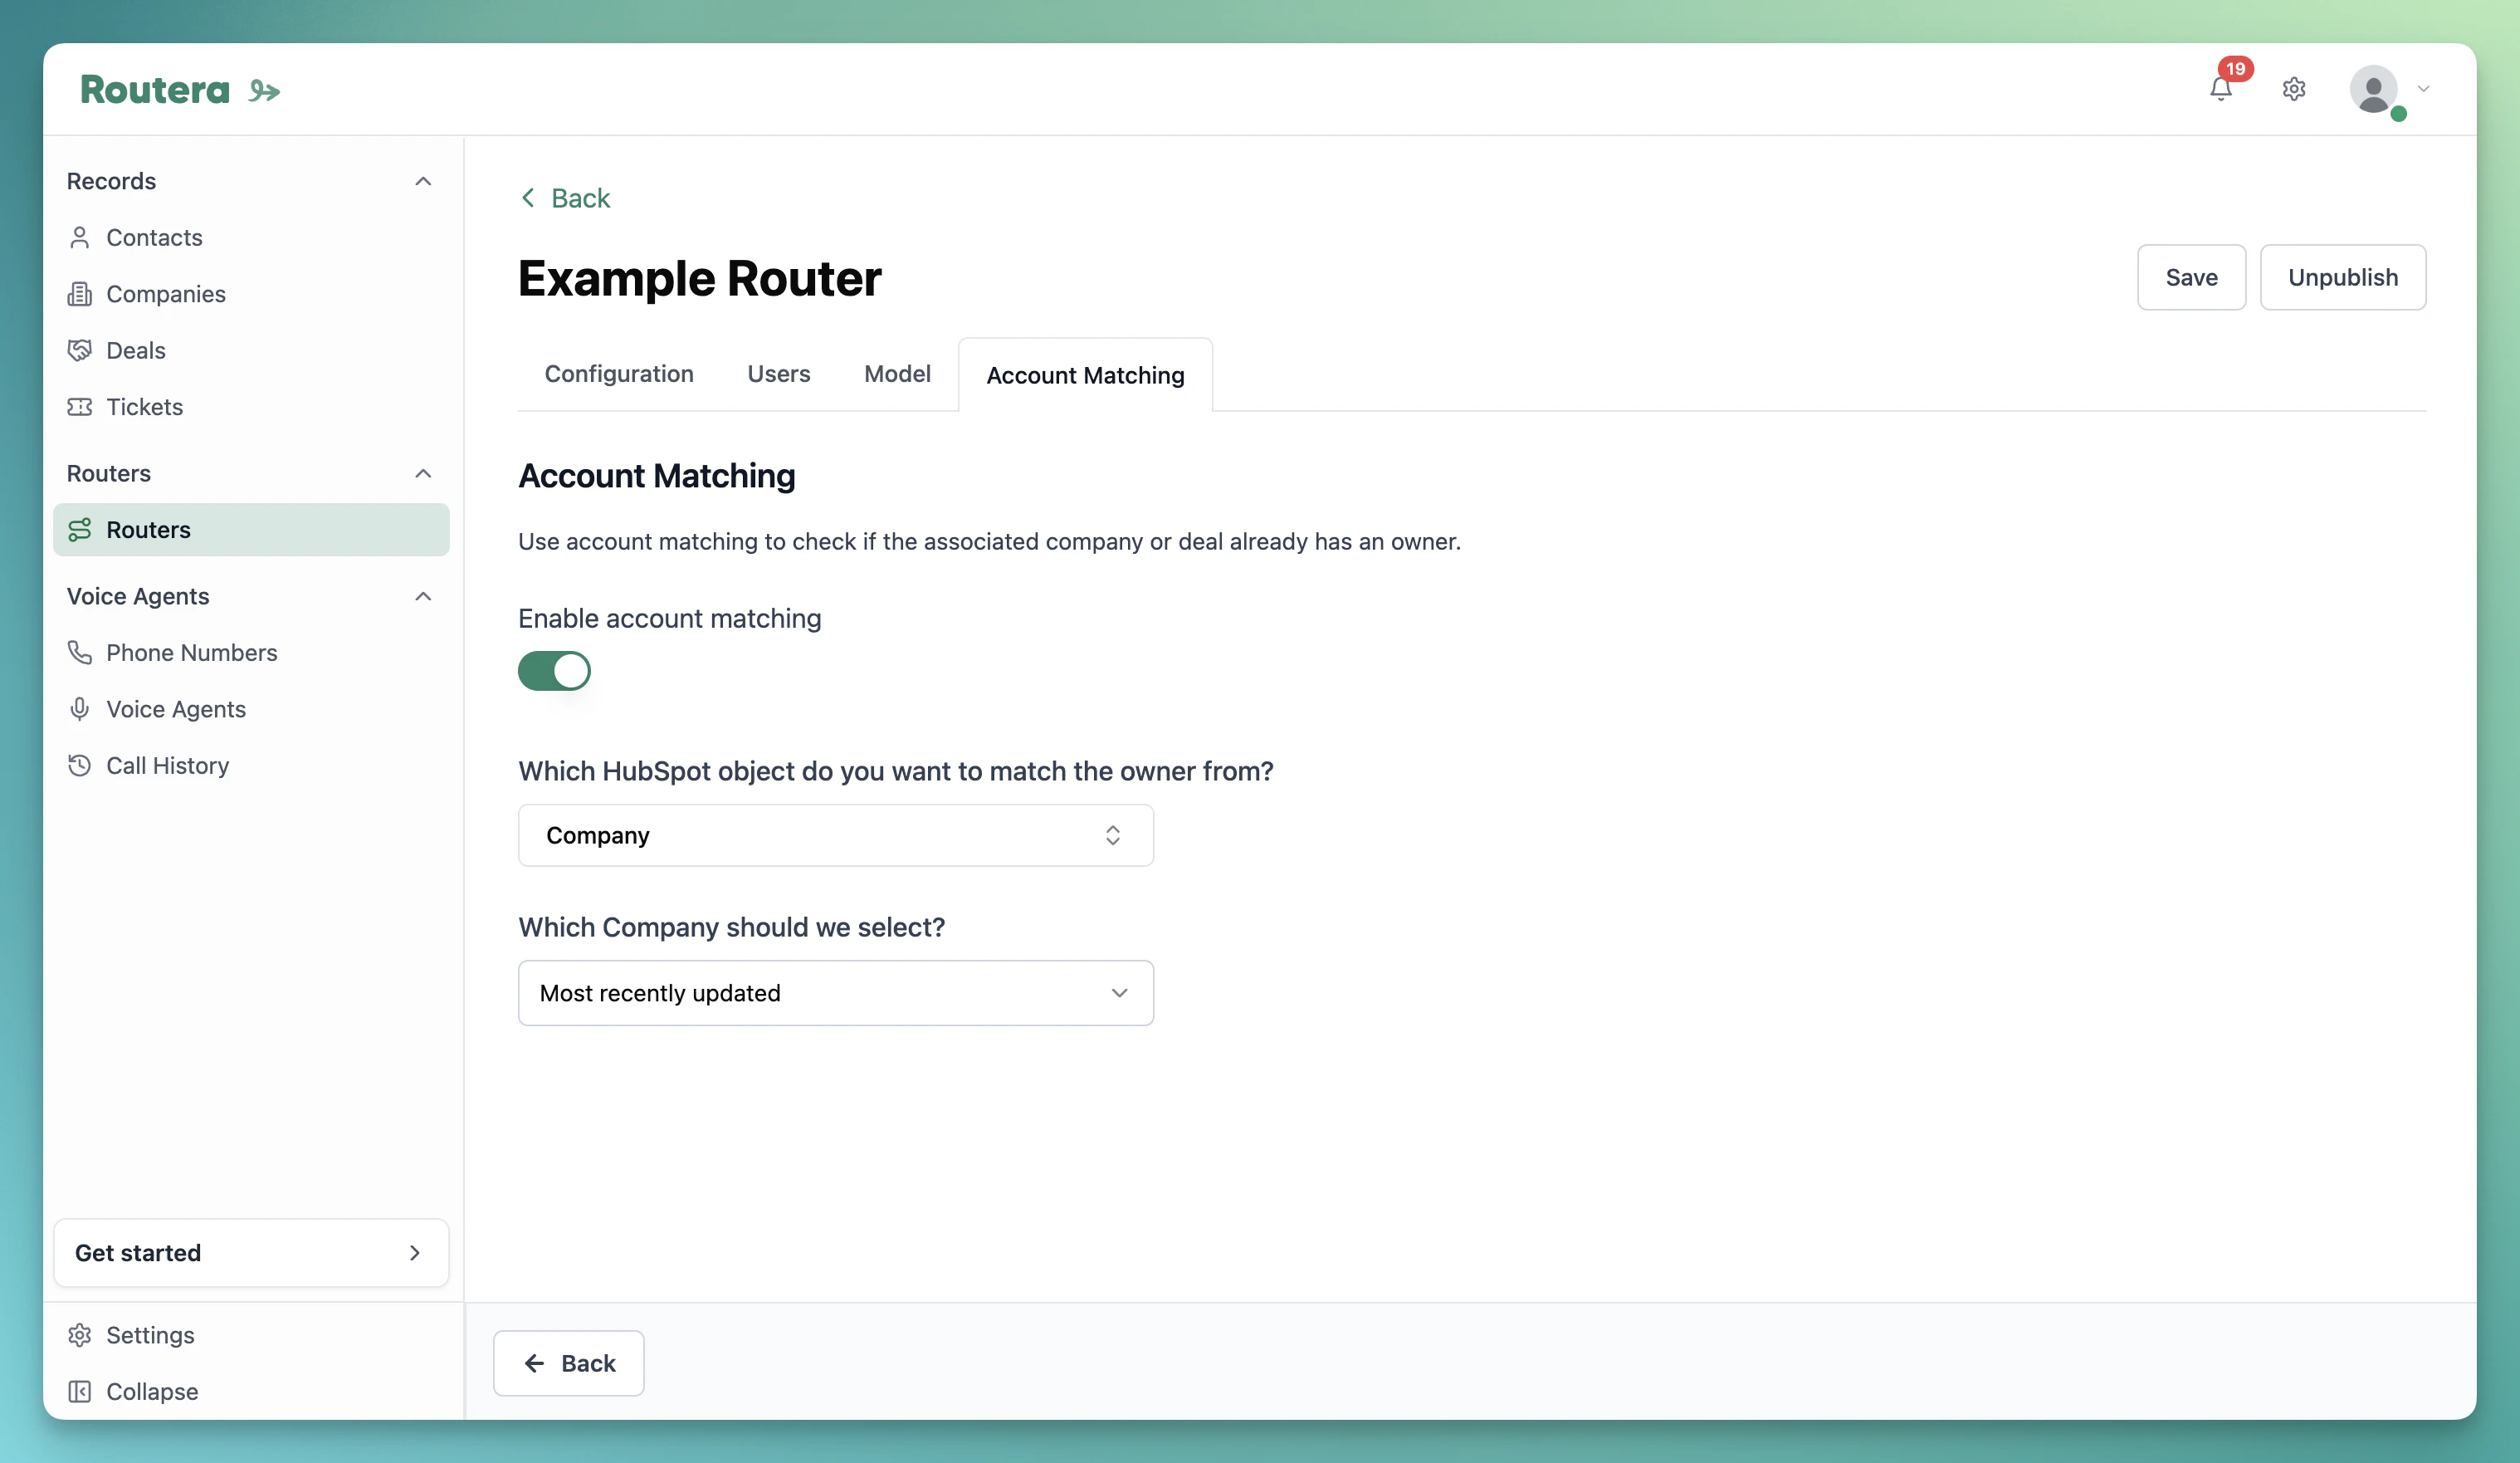
### Account Matching
On the **Account Matching** tab (optional):
1. Turn on **Enable account matching**.
2. Choose **which HubSpot object** to pull an owner from (for example Company when the router targets Contacts).
3. Choose **which record** to use if several exist: most recently updated, most recently created, or first created.
Example: a contact router can inherit the **company owner** when the contact has no owner.
 ### Save, publish, and connect HubSpot
1. Click **Save & Publish** on a new router, or **Save** then **Publish** on a draft.
2. In HubSpot, create a workflow for the **same object type** as the router.
3. Add an enrollment trigger (or skip trigger and set eligible records), then add **Assign with Routera**.
4. Select this router and publish the workflow.
### Save, publish, and connect HubSpot
1. Click **Save & Publish** on a new router, or **Save** then **Publish** on a draft.
2. In HubSpot, create a workflow for the **same object type** as the router.
3. Add an enrollment trigger (or skip trigger and set eligible records), then add **Assign with Routera**.
4. Select this router and publish the workflow.
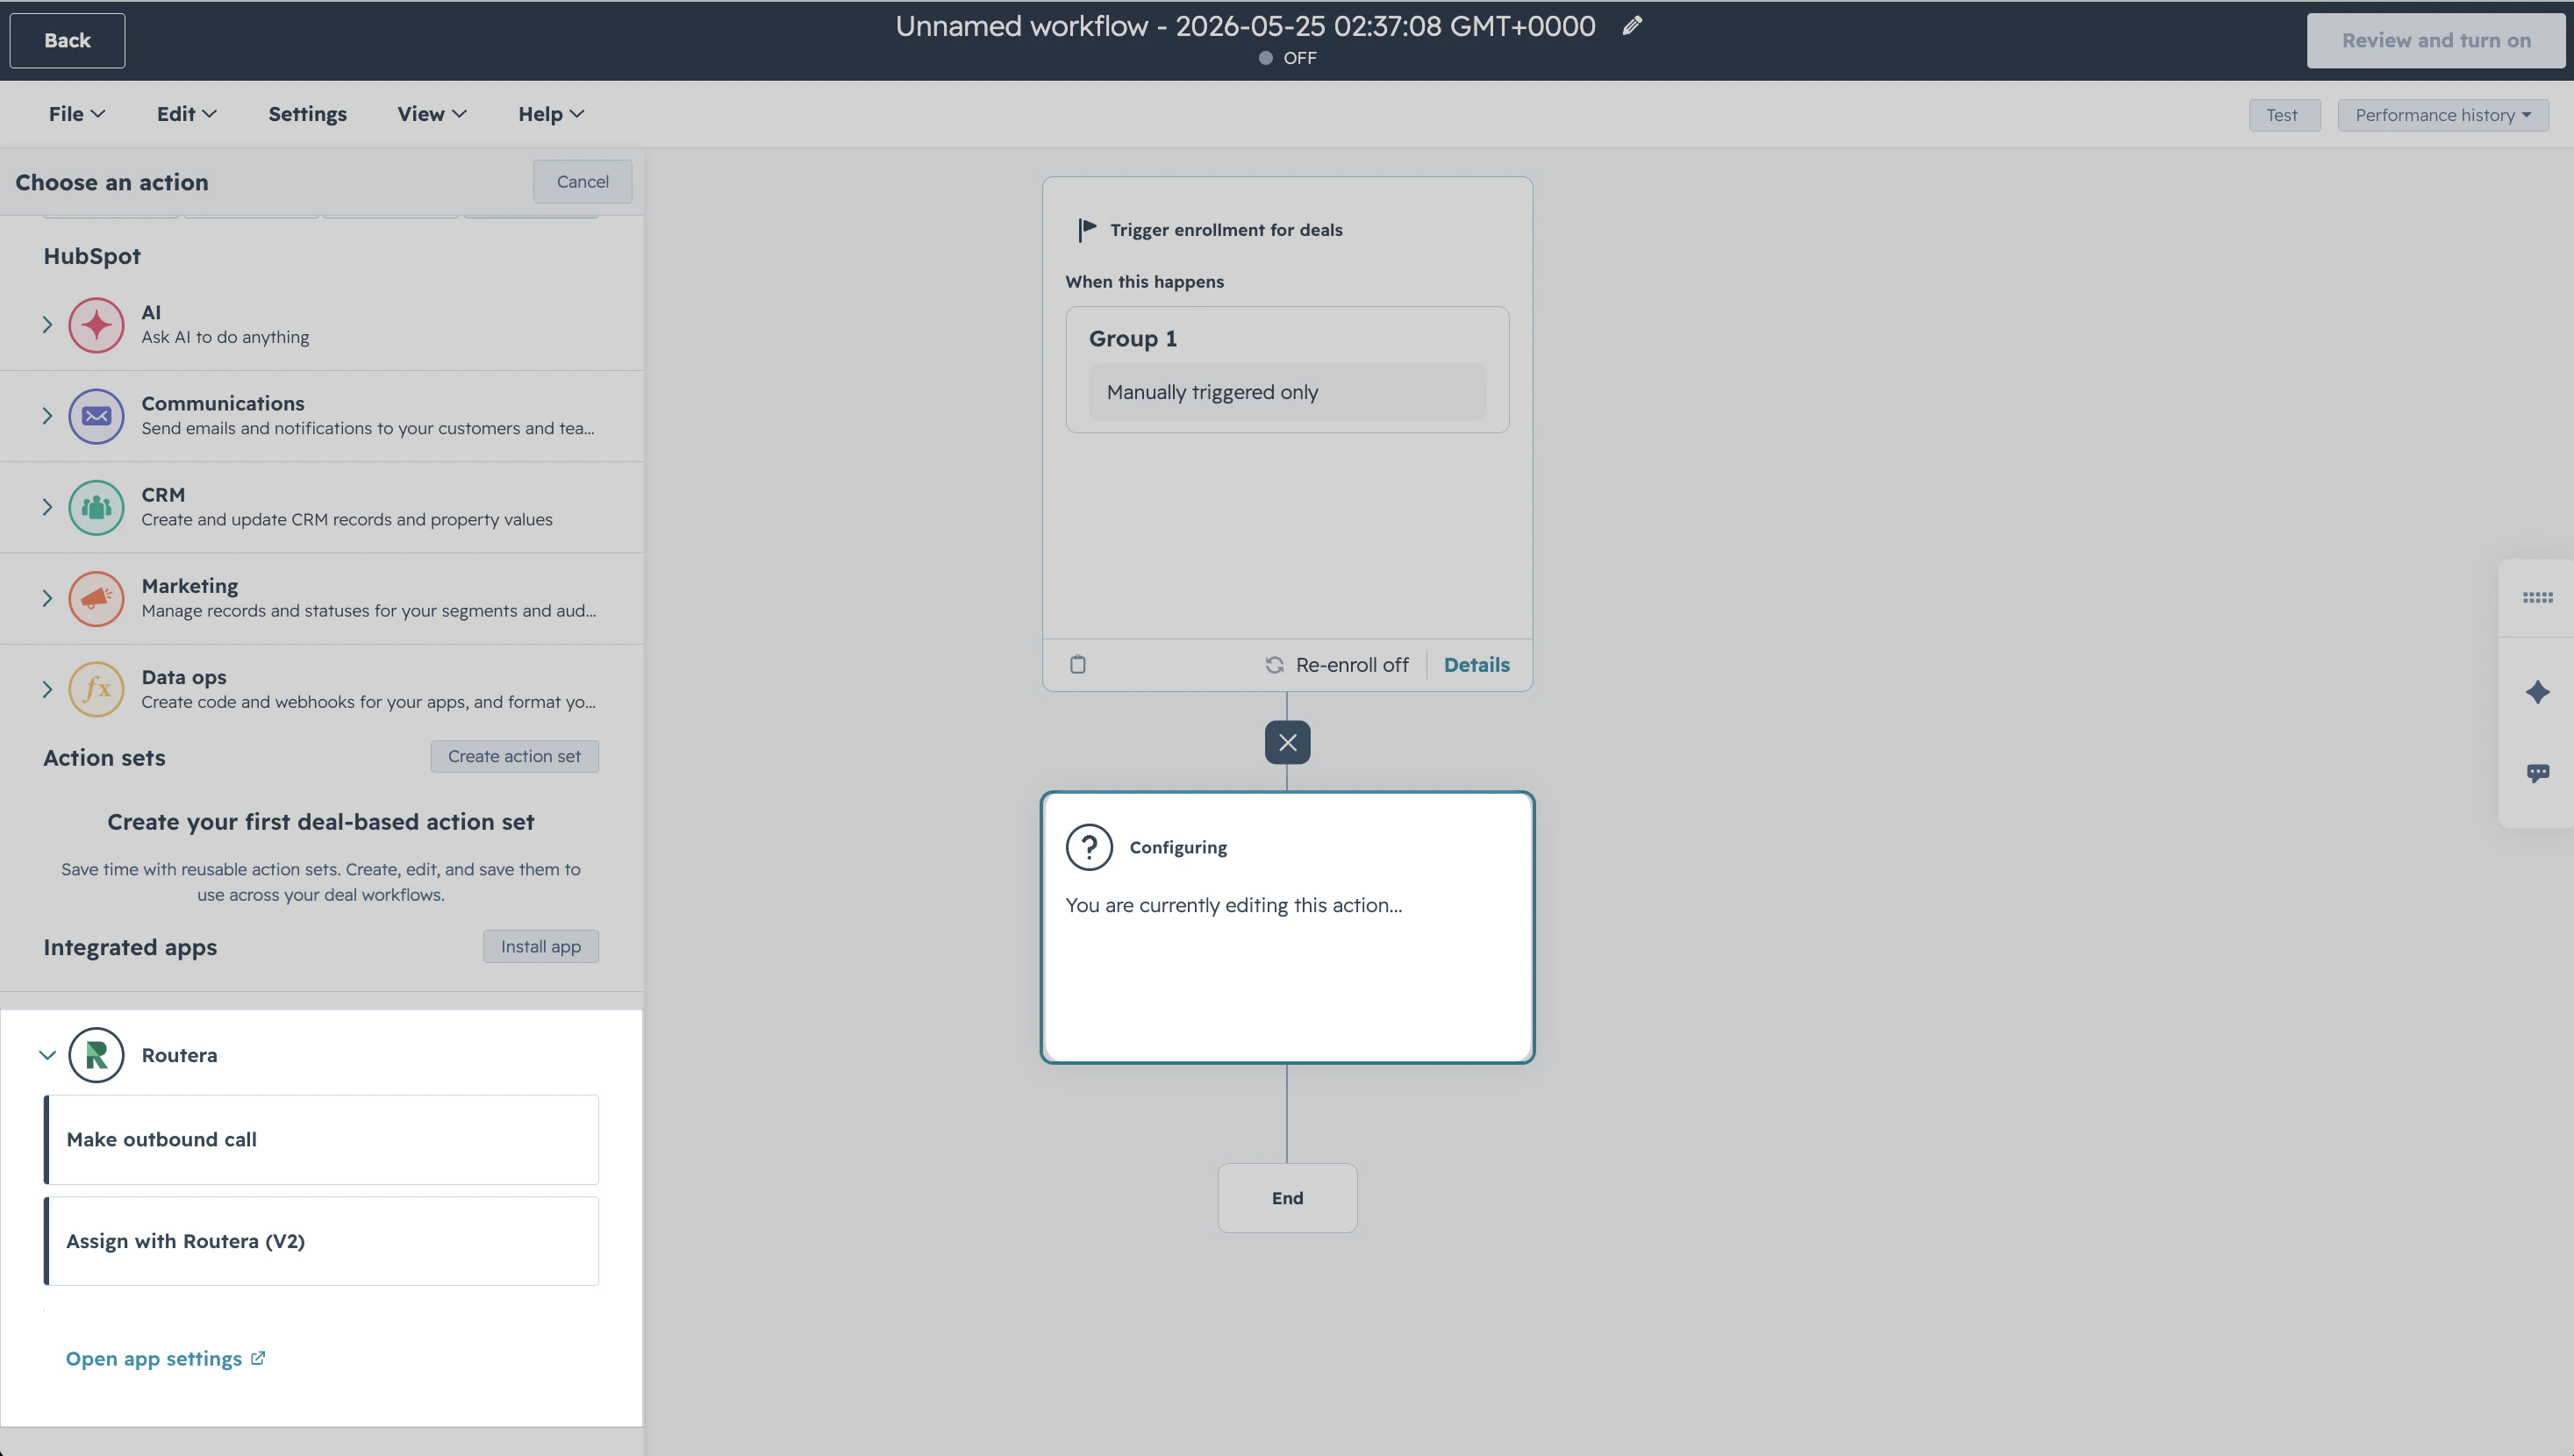 HubSpot sends eligible records to Routera; Routera applies your users, model, overwrite rules, and account matching, then writes the owner back to HubSpot.
***
## Quick reference
| Topic | Routera only | HubSpot CRM |
| --------------------------------- | -------------------------------- | ------------------------------------------ |
| What starts assignment | **Enrollment Trigger** + publish | HubSpot workflow + **Assign with Routera** |
| User list | All workspace members | HubSpot-linked users |
| Account matching | Not used | Available |
| Owner written to | Routera owner field | HubSpot owner property |
| Existing records on first publish | **Route existing leads?** modal | Controlled in HubSpot enrollment |
Start with **Routera only** and a small user group, publish, and test one matching record before scaling. If you adopt HubSpot CRM mode later, duplicate the router logic and add the workflow step in HubSpot.
HubSpot sends eligible records to Routera; Routera applies your users, model, overwrite rules, and account matching, then writes the owner back to HubSpot.
***
## Quick reference
| Topic | Routera only | HubSpot CRM |
| --------------------------------- | -------------------------------- | ------------------------------------------ |
| What starts assignment | **Enrollment Trigger** + publish | HubSpot workflow + **Assign with Routera** |
| User list | All workspace members | HubSpot-linked users |
| Account matching | Not used | Available |
| Owner written to | Routera owner field | HubSpot owner property |
| Existing records on first publish | **Route existing leads?** modal | Controlled in HubSpot enrollment |
Start with **Routera only** and a small user group, publish, and test one matching record before scaling. If you adopt HubSpot CRM mode later, duplicate the router logic and add the workflow step in HubSpot.