> ## Documentation Index
> Fetch the complete documentation index at: https://docs.routera.io/llms.txt
> Use this file to discover all available pages before exploring further.
# Integrate HubSpot
> Connect HubSpot, map fields, and use CRM data in routing, capacities, and voice agents.
Connect HubSpot so Routera can sync records, write owner assignments back to HubSpot, and align field values between systems. After connection, map fields under **Settings** → **Integrations**, then use **HubSpot CRM** routers and HubSpot workflows as described in [Creating routers](/kb/creating-routers).
## Connect HubSpot
1. Open **Settings** → **Integrations**.
2. On the **HubSpot** card, click **Connect**.
3. In HubSpot, choose the portal and click **Choose Account**.
4. Review the requested permissions, then click **Connect app**.
5. When connection succeeds, the card shows **Portal ID** and **Disconnect**. Routera matches workspace members to HubSpot owners by **email** when possible.
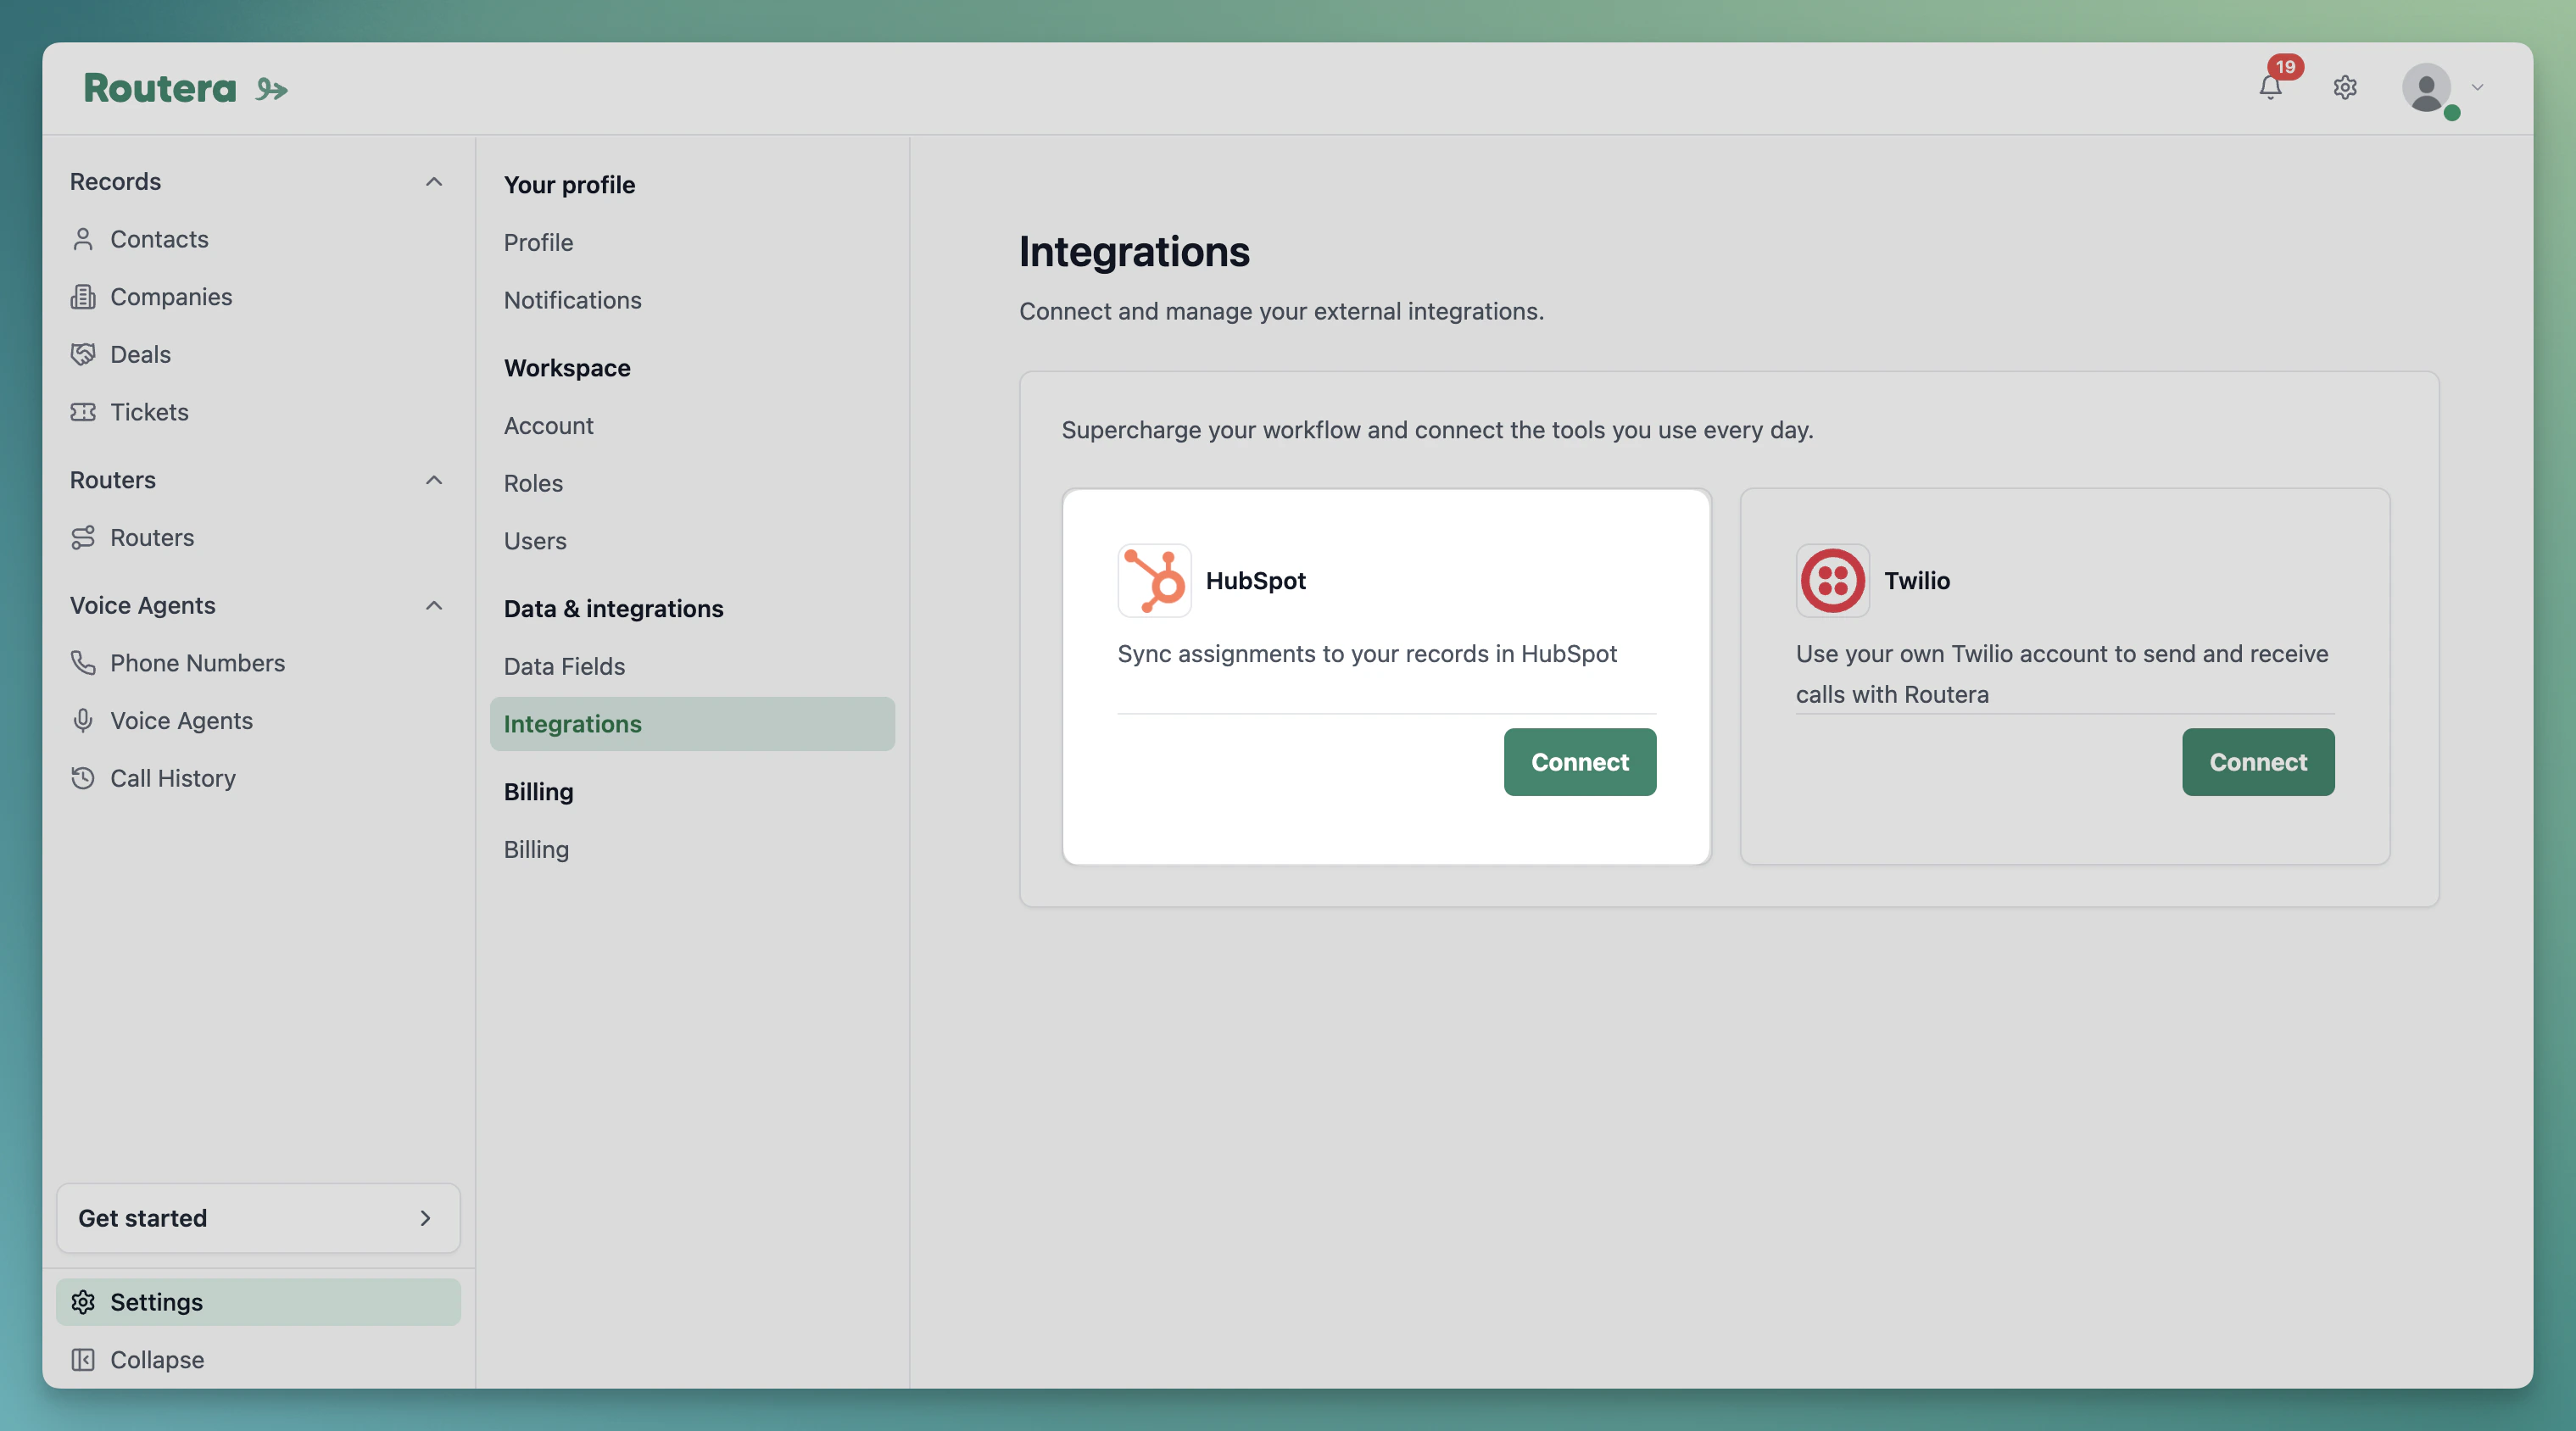 An admin with permission to manage integrations should complete OAuth. If you start a **HubSpot CRM** router without a connection, Routera prompts you to open **Settings** → **Integrations**.
To remove the integration, click **Disconnect** on the HubSpot card and confirm. This affects HubSpot workflows that use **Assign with Routera**.
***
## Field mappings
Field mappings tell Routera which Routera fields correspond to which HubSpot properties for each object type. They keep synced data aligned and are required for some features (for example enumeration fields used in [Creating capacities](/kb/creating-capacities)).
### Open the mapping modal
1. Go to **Settings** → **Integrations**.
2. On the connected **HubSpot** card, click the **gear** button (top right).
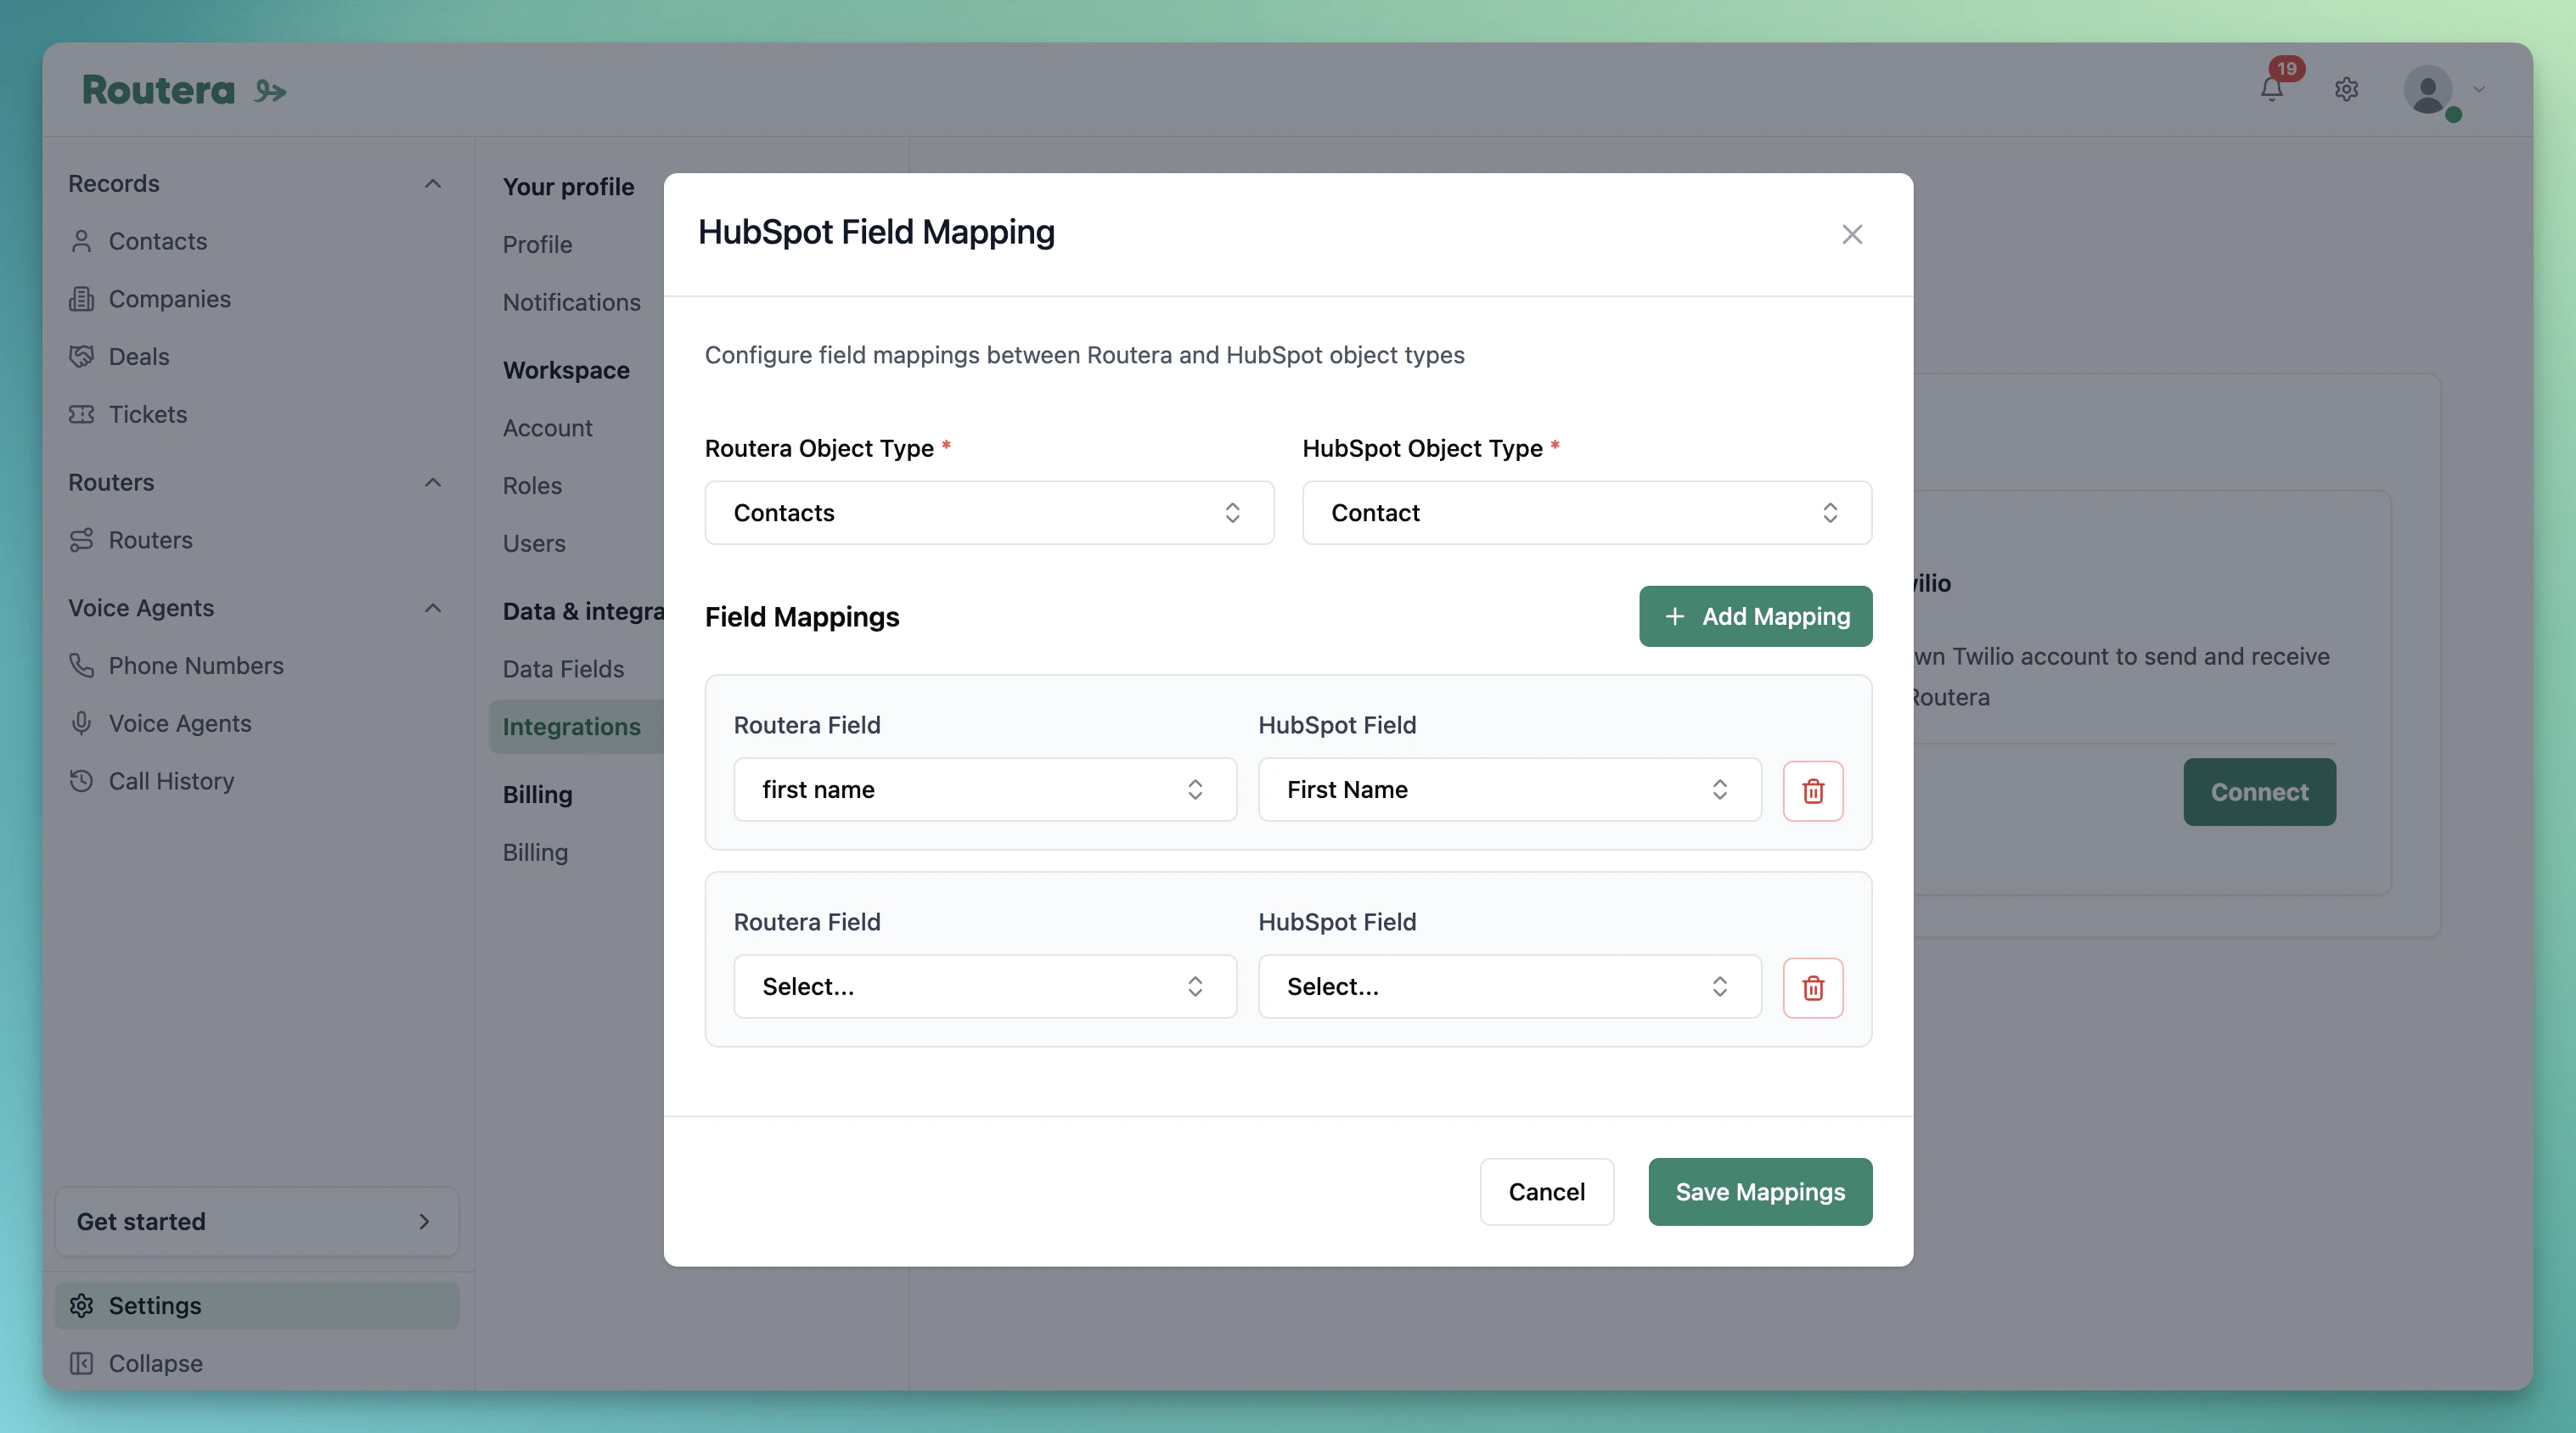
3. The **HubSpot Field Mapping** modal opens.
An admin with permission to manage integrations should complete OAuth. If you start a **HubSpot CRM** router without a connection, Routera prompts you to open **Settings** → **Integrations**.
To remove the integration, click **Disconnect** on the HubSpot card and confirm. This affects HubSpot workflows that use **Assign with Routera**.
***
## Field mappings
Field mappings tell Routera which Routera fields correspond to which HubSpot properties for each object type. They keep synced data aligned and are required for some features (for example enumeration fields used in [Creating capacities](/kb/creating-capacities)).
### Open the mapping modal
1. Go to **Settings** → **Integrations**.
2. On the connected **HubSpot** card, click the **gear** button (top right).
3. The **HubSpot Field Mapping** modal opens.
 ### Map fields
1. Select **Routera Object Type** and **HubSpot Object Type** (for example Routera **Deal** with HubSpot **Deal**).
2. Under **Field Mappings**, click **Add Mapping**.
3. Choose **Routera Field** and **HubSpot Field**. HubSpot options are filtered to types compatible with the Routera field.
4. Repeat for each field that should stay in sync.
5. Click **Save Mappings**.
**Compatible types:**
| Routera field type | HubSpot property types |
| --------------------------- | ---------------------------------------- |
| Single-line text (`string`) | `string` |
| Number | `number` |
| Date (`datetime`) | `date`, `datetime` |
| Dropdown (`enumeration`) | `enumeration` (and related select types) |
| User | `enumeration` (owner-style fields) |
### Match dropdown options
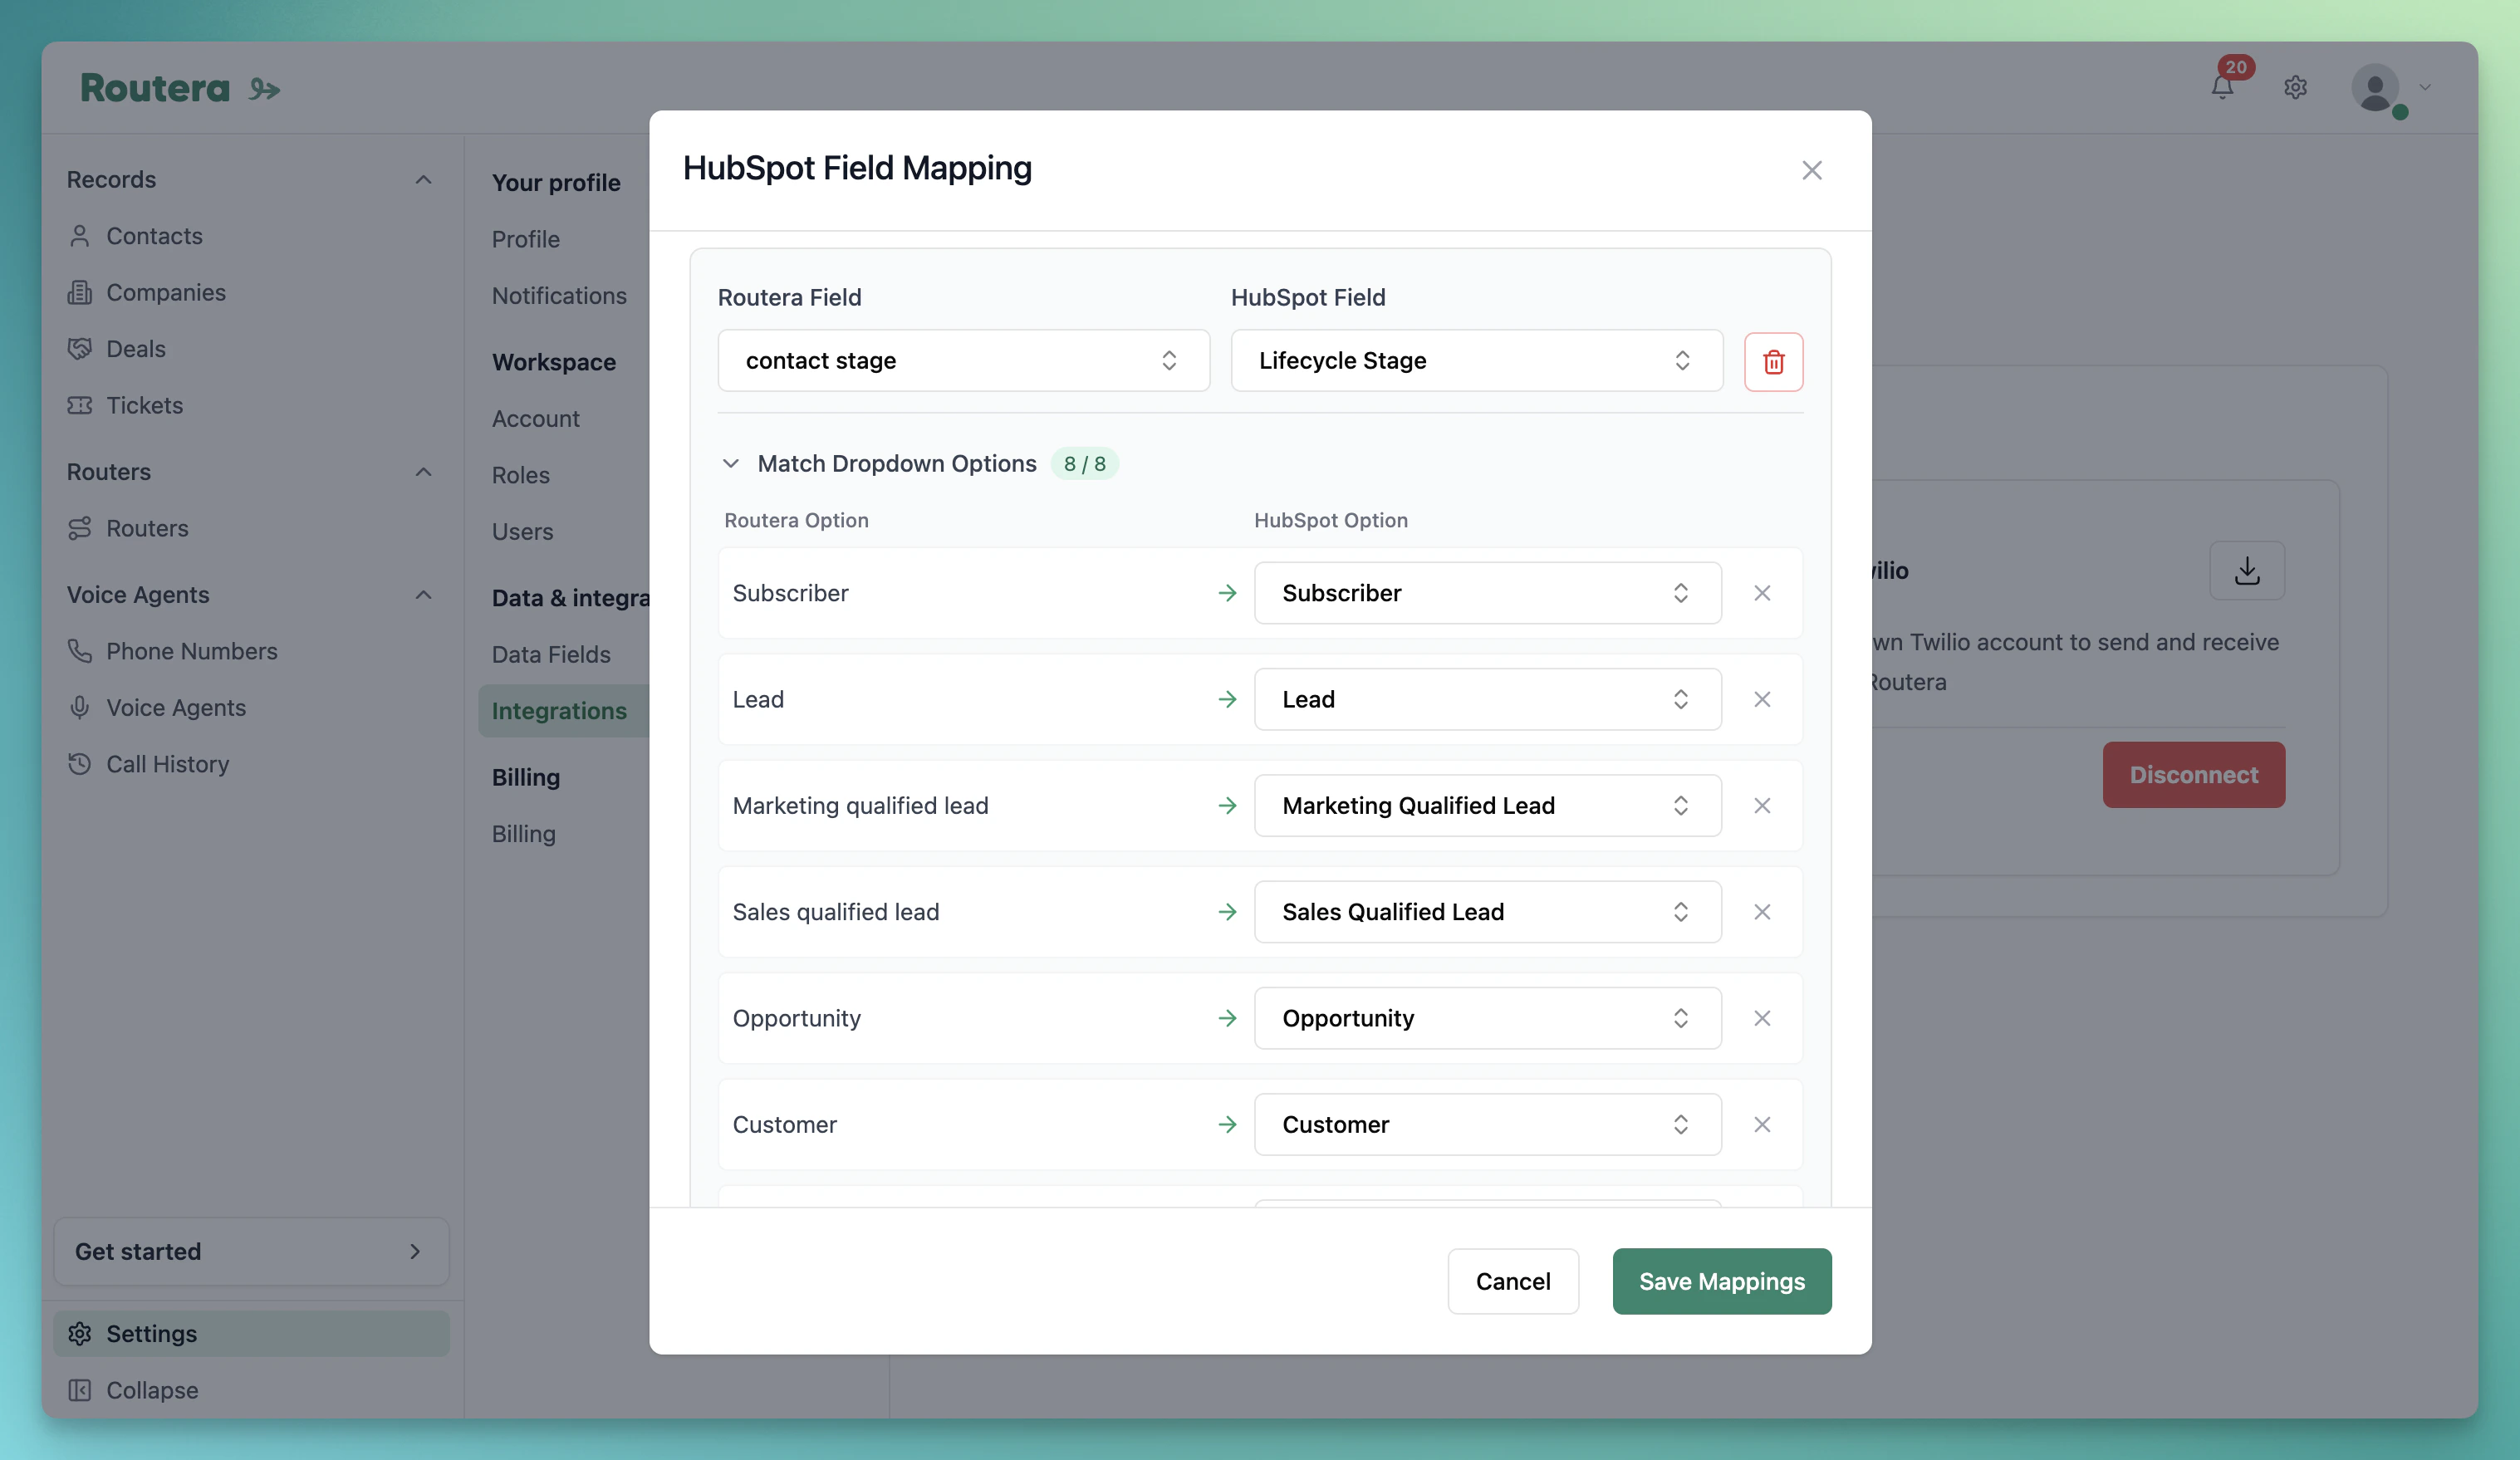
When you map a **Dropdown** or **User** field to a HubSpot enumeration, expand **Match Dropdown Options**:
1. Map each **Routera Option** to a **HubSpot Option** (progress shows as `3 / 5`, and so on).
2. Unmapped Routera values are highlighted until you assign a HubSpot option.
3. Each HubSpot option can map to only one Routera value.
4. Save only after every Routera option is mapped.
Routera may auto-suggest matches from similar labels or internal names. Clear a row mapping with the **X** on a matched option.
### Map fields
1. Select **Routera Object Type** and **HubSpot Object Type** (for example Routera **Deal** with HubSpot **Deal**).
2. Under **Field Mappings**, click **Add Mapping**.
3. Choose **Routera Field** and **HubSpot Field**. HubSpot options are filtered to types compatible with the Routera field.
4. Repeat for each field that should stay in sync.
5. Click **Save Mappings**.
**Compatible types:**
| Routera field type | HubSpot property types |
| --------------------------- | ---------------------------------------- |
| Single-line text (`string`) | `string` |
| Number | `number` |
| Date (`datetime`) | `date`, `datetime` |
| Dropdown (`enumeration`) | `enumeration` (and related select types) |
| User | `enumeration` (owner-style fields) |
### Match dropdown options
When you map a **Dropdown** or **User** field to a HubSpot enumeration, expand **Match Dropdown Options**:
1. Map each **Routera Option** to a **HubSpot Option** (progress shows as `3 / 5`, and so on).
2. Unmapped Routera values are highlighted until you assign a HubSpot option.
3. Each HubSpot option can map to only one Routera value.
4. Save only after every Routera option is mapped.
Routera may auto-suggest matches from similar labels or internal names. Clear a row mapping with the **X** on a matched option.
 ### Edit or remove mappings
* Reopen the modal with the **gear** button, select the same object types, and your saved mappings load.
* Remove a row with the **trash** icon on the right.
* Click **Save Mappings** after changes.
***
## What HubSpot enables
| Feature | How HubSpot is used |
| --------------------------------------------------------------- | ------------------------------------------------------------------------------------- |
| **[Creating routers](/kb/creating-routers)** (HubSpot CRM mode) | Records enroll via HubSpot workflow **Assign with Routera**; owners update in HubSpot |
| **[Creating capacities](/kb/creating-capacities)** | Enumeration fields should be mapped so counts stay accurate across systems |
| **[Managing data fields](/kb/managing-fields)** | **User** fields can create matching owner fields in HubSpot when connected |
| **[Create voice agents](/kb/create-voice-agent)** | Mapped contact fields supply `{{internal_name}}` tokens on synced records |
Map owner-related and stage or status fields you rely on in routing before publishing CRM routers or capacities. Test with one record after saving mappings.
### Edit or remove mappings
* Reopen the modal with the **gear** button, select the same object types, and your saved mappings load.
* Remove a row with the **trash** icon on the right.
* Click **Save Mappings** after changes.
***
## What HubSpot enables
| Feature | How HubSpot is used |
| --------------------------------------------------------------- | ------------------------------------------------------------------------------------- |
| **[Creating routers](/kb/creating-routers)** (HubSpot CRM mode) | Records enroll via HubSpot workflow **Assign with Routera**; owners update in HubSpot |
| **[Creating capacities](/kb/creating-capacities)** | Enumeration fields should be mapped so counts stay accurate across systems |
| **[Managing data fields](/kb/managing-fields)** | **User** fields can create matching owner fields in HubSpot when connected |
| **[Create voice agents](/kb/create-voice-agent)** | Mapped contact fields supply `{{internal_name}}` tokens on synced records |
Map owner-related and stage or status fields you rely on in routing before publishing CRM routers or capacities. Test with one record after saving mappings.